Friday, September 27, 2013

Hello Stud Muffin

Hello lovelies!

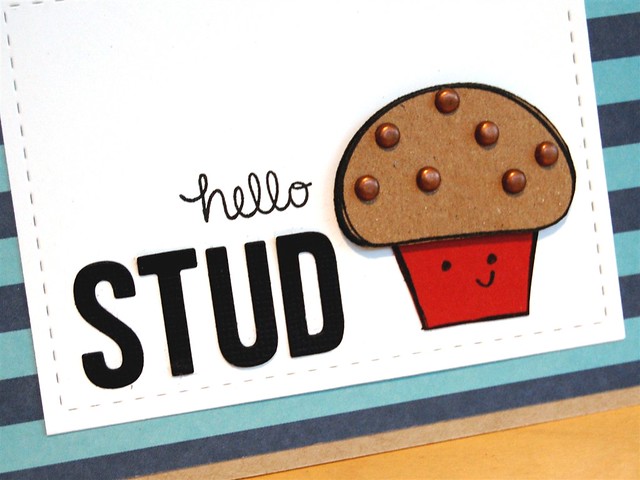
I am on the Neat & Tangled blog today sharing a card I made suitable for the the big and little men in your life!  Last weekend, I was at a youth football game and saw a little boy wearing a shirt similar to this one.


 I am not sure that I have ever called anyone a "stud muffin," but I think it's an adorable term of endearment.  I pulled out Sketchy Cupcakes and thought about how I could turn the muffin into a "stud muffin."

I made a card base from kraft cardstock and trimmed a panel of patterned paper and adhered it to the front. Next, I die cut a stitched rectangle from white cardstock.  I also die cut the word "stud" using some alphabet dies on black cardstock.

dsc_0475

I stamped the muffin top and wrapper onto cardstock and trimmed them out.  The stud part of the muffin was realized through the use of some bronze brad that have been in my embellishment stash forever.

I adhered the die cut letters and the studded muffin to the white rectangle and stamped "hello" from Just Hello to the card.


dsc_0476

This weekend, this card will be making it's way to Grayson Savery.  You may have seen Danielle's post a few weeks back that she has reopened the Happy Mail for Grayson campaign.  You can read all about it here, and more about Grayson here.


I hope that it brings a smile!  Have a great weekend friends!  Thanks for stopping by!

Katie
Supplies:
Cardstock: White, Kraft, Vino (Avery Elle)
Patterned Paper: Project Life Honey Edition 12 x 12 papers
Stamps: Sketchy Cupcakes and Just Hello (Neat and Tangled)
Ink: Versafine Black
Dies: Coles ABCs (Lawn Fawn), Stitched Rectangles (Lil Inker Designs)
Brads: Making Memories

Wednesday, September 25, 2013

Avery Elle- Suzani Season's Greetings

Hello friends,

Do you know what today is?  It is exactly 3 months until Christmas, and if you are anything like me, you have a LOT to do before the big day arrives.  With that in mind for this week's Avery Elle card, I decided to put a little holiday spin on Suzani.


On a rustic cream panel, I stamped the medallions from Suzani in various shades of red and green.  I borrowed the sentiment from Warm Wishes and the sparkles from Merry and Bright


I wanted to keep the card flat, which I think is important if you plan to mail your holiday cards. To add a bit more interest, I inked the edge of the card before debossing it with a canvas texture plate and adhering it to a card base made from kraft cardstock. 

 Today is my last post as Avery Elle's September guest designer.  I have immensely enjoyed this experience working with the Avery Elle team, and I would like to thank Jamie for having me as a guest this month!  If you would like an opportunity to be Avery Elle's guest designer for November, the AEI{heart}U challenge is open until September 29.  Click here for more details!  

Thanks for stopping by!  Have a great Wednesday!
Katie

Thursday, September 19, 2013

SPARKS Challenge: Birthday Castle in the Clouds


Hi friends,

I am playing along with this week's Paper Smooches SPARKs Challenge.  I have birthdays on the brain this week as my little princess, Sophie turned 6 years old.  Using the color inspiration from this week's challenge, I used Royal Cuteness and Birthday Sampler to create a little Birthday Castle in the Clouds.
dsc_0438


I trimmed a piece of teal polka dot paper and adhere it to a card base made from light gray cardstock. Next, I die cut a flag from purple cardstock and adhered it to the patterned paper.  I die cut some clouds from light and dark gray cardstock. I stamped the sentiment on the light gray cloud and adhered all the clouds to the card.

dsc_0440


I stamped the castle on light gray cardstock, colored it with markers and added some stickles for a little sparkle and shine.  This is the first time the I have used Paper Smooches open format dies and I love them!!  It is so much easier to stamp then die cut. I adhered the castle with a bit of foam tape and added some lime green enamel dots as a finishing touch.


Here is a look at this week's colors, Fresh Fall:


Well that's all for me today!  
Thanks for stopping by!
Katie

Wednesday, September 18, 2013

Avery Elle- Shoot for the Stars


Hello friends, Happy Wednesday!

I am just popping in today as Avery Elle's guest designer for September to share a card I made with the Written in the Stars set.

  Avery Elle- Written in the Stars 

 I adore the many, many occasions that this set covers... love, friendship, birthday... and I thought that for this week, I would try an encouragement card. I stamped the background strip repeatedly on a card I made from Aquamarine card stock.  Next, I die-cut a stitched circle and stamped the star arrow and sentiment.

Avery Elle- Written in the Stars close up

I die-cut a star border from yellow and orange card stock, matted it to black cardstock and adhered it on a diagonal across the front of the card.  I adhered the stamped circle with a bit of foam tape. A couple small die-cut stars accent the sentiment and arrow image.  I really like how these bold colors work together. This card would even work for a recent graduate!

Well that's all for me today!  Be sure to stop by the Avery Elle blog to see the other amazing project from the design team that Jamie is highlighting today.

Thanks for stopping by!
Katie

Edited to add:  I got a question about what I used to create the tiny stars on the sentiment circle.  I used these border dies from Papertrey Ink.  The stitched circle is from Lil Inker designs.

Wednesday, September 11, 2013

Avery Elle- Suzani

This is my second post today.  To see my Neat and Tangled project, please scroll down or click here.

Hello all!

I am back today as a guest designer with Avery Elle to share a card I made with Suzani and Oh Happy Day.

dsc_0421

I got a little inky with this card and stamped the Suzani medallions in various colors of ink onto cream card stock.  Next, I distressed the panel and inked the edges and attached it to a kraft card stock base.

dsc_0422

I die cut some banners and stamped the sentiment before inking the edges and adhering to the card.  A button tied with twine added a finishing touch.

Well that's all for me today!  Thanks for stopping by!
Katie


Introducing Just For You!

Happy Wednesday friends!

Neat and Tangled's Release week is rolling along and today we are showcasing projects made with Just for You.  Just for You is a must have set featuring lots elements to help celebrate life's little and big occasions too.

Just for You

I love Danielle's handwriting and this set is full of her fantastic scribe.  I stamped the "Celebrate" sentiment onto a panel of white card stock and colored in the loops with Copics.  I accented the sentiment with some stamped confetti and a few sequins.  Next I wrapped the panel with a chevron ribbon tied into a bow and I mounted the finished panel onto a black card stock base. 


 Just for You will be released on Friday, September 13 at 8 a.m. at the Neat and Tangled shop.  Be sure to stop by the Neat and Tangled blog today to preview the full set, check out more inspiration from my talented teammates and a for chance to win this awesome set!

Thanks for stopping by!
Katie

Tuesday, September 10, 2013

Introducing Santa's Tags!


Hello friends!

Today we are previewing another new set from Neat and Tangled called Santa's Tags.  Santa's Tags and all the other adorable sets that we are previewing this week will be available for purchase in the Neat & Tangled shop on Friday, October 13, 2013.

While Santa's tags is perfect for all of your holiday gifting needs, something about this set called out to me in a very magical way... so my tags took a trip down to sunny Florida to help accent a little tag book I made of some of our favorite pictures from a 2012 family vacation to Walt Disney World.

dsc_0428

I started by die-cutting about 12 or so tags from kraft cardstock.  For the album cover, I stamped the tag onto grid paper and added the sentiment, star bursts and dots also from the set.  I added a strip of patterned paper to the bottom of the tag for more stripey fun, but you could also use one of the awesome border stamps from On the Strip and get a similar look. 

dsc_0429

Inside the album, the tag became a journaling box. I trimmed the edge of the tag and added a little washi tape for decoration.

dsc_0431

A couple other Neat and Tangled sets also made an appearance in the album. :)  The patterned paper and chipboard accents throughout the album are from Simple Stories, Say Cheese collection.  The ribbon tied around the jump ring is from my stash.

Be sure to stop by the Neat and Tangled blog to see all the other amazing projects my teammates made with this set PLUS a chance to win this set and see what magic you can create!

Have a goodie!  Thanks for stopping by!
Katie

Monday, September 9, 2013

Introducing Simple Christmas!


Good morning!

It's release week at Neat and Tangled and I am super excited to be sharing a little gift set I created inspired by and using Simple Christmas.

dsc_0397

Using the adorable house from the set as a starting point, I set about looking for a cut file to create a gift box that I could adorn with the pine boughs and pinecones included in the set. I settled upon this one from the Silhouette store.

dsc_0400

Using my portrait, I die cut the house and trim from white and kraft cardstock and assembled it. 


dsc_0402

Then I stamped the boughs onto green cardstock and trimmed them out.  I stamped the pinecones on kraft cardstock with brown ink and added them to the boughs. A cluster of enamel dots serve as berries.  I also stamped the bough onto the wreath that came with the die cut house to give it a bit more detail.

dsc_0398

For the tag, I stamped the house onto a kraft with brown ink.  Next, I embossed the sentiment and a bough in white.  A small red heart and some red ribbon ties in the red accents from the house. 

Simple Christmas, along with 5 other amazing sets will be available for purchase on Friday, September 13 at 8 a.m. at the Neat and Tangled shop. Please be sure to stop by the Neat and Tangled blog to see what the other members of the team created with this set. 

That's all for me today!  Thanks for stopping by!

Katie

Wednesday, September 4, 2013

Avery Elle- Written in the Stars

Hello friends,

I am on the Avery Elle blog today sharing a card I made using the Written in the Stars set.

Avery Elle- Written in the Stars

I die cut a circle, then stamped and embossed some of the birthday astrological signs.  I used a navy cardstock that has some speckling- I thought it looked like stars and that lent itself nicely to this celestial set. 

I attached the stamped circle to a kraft card base and stamped the sentiment in navy ink. 

Here is a close-up of the embossed images:

dsc_0389

Well, that's all for me today!  Thanks so much for stopping by!

Katie