Sunday, March 30, 2014

A Tropical View Card

Hello friends!  

Happy Sunday! It's time for another Paper Smooches SPARKS challenge!!!  Since there are 5 Sundays in March, we are doing a bonus Anything Goes challenge, and here's my card: 


I stamped a panel of Raspberry Fizz cardstock with the chevron stripes from Geo-graphic.  Next, I die cut a pair of glasses using my Silhouette and created a little scene using Borders 1 dies, a circle punch, and the palm trees from Get Outta Town


I stamped the sentiment (also from Get Outta Town) in Versamark and heat embossed it with white embossing powder and attached the completed panel onto a kraft card stock base.  The kraft reminds me of a sandy beach! 


You have until 11:59 PT on Saturday, April 5 to link up your take on this week's sketch to the Paper Smooches SPARKS blog for a chance to win a $30.00 gift certificate to the Paper Smooches store. Woot woot!  

Be sure to check out the amazing inspiration from the other members of the SPARKS design team playing along with this week's challenge: 


That's all I've got for today!  Thanks for stopping by! I can't wait to see what you create! 

Katie

Saturday, March 29, 2014

DIY enamel dots


Hello friends, 

Happy Saturday!  Around our house, Saturday is typically the day that we attempt DIY projects.  You know, painting, refinishing furniture, cleaning out, decorating and the like.  I thought then that Saturday might be a good opportunity to share different DIY crafty projects and techniques as well.  

Last week, I tried my hand at the DIY enamel dot technique that has been floating around the paper crafting community. About a month ago, Betsy Veldman wrote a post on the Plugged in with Paper Crafts how she baked up a batch of enamel dots from pony beads. A few ingenious crafters took the technique a step further and tried melting enamel dots from Perler beads and shared their experience in a thread on the Two Peas in a Bucket community.   

Perler beads are widely found in kids crafts area of most major craft stores.  My daughters have quite the collection and use them to create various designs and creatures made from the beads and adhered together with the help of wax paper and an iron. 

Here is what you will need to try this technique at home: 
  • Perler beads in various colors
  • Oven or toaster over
  • Parchment paper- this is available at most supermarkets or in the fancy baking area of the crafty and hobby stores.  I found a roll at Michaels. 
  • Baking sheet
I have include some step- by-step photos, but please forgive the quality, I snapped them with my phone. 


Preheat the oven to 325 degrees and line a small baking sheet with parchment paper. and stand up the enamel dots on end.  


Bake the dots for 35 minutes.  Remove from the oven and allow to cool for a few minutes before removing from the parchment. Since Perler beads are meant to be melted, I did not notice any odor of melting plastic.

Voila!  Perfectly rounded enamel dots- don't they look yummy!


I also tried the technique with the IKEA Pyssla beads.  


I found that these beads did not melt as roundly or evenly as the Perler brand beads.


A few tips I learned and I thought I would pass along... 
  • Standing up the perler beads on end is a bit tricky.  Use a knife to carefully space them out.  They will spread out a bit when melting and if they are too close, they will conjoin.  
  • Darker colors- think black, blue, purple- will take a bit longer to melt.  I noticed a baking time of 45 minutes. If you take take the beads out and notice a dimple in the center, put them back in the over for 3-5 minutes and the dimple should smooth out. Do watch them carefully, because they can burn. 
  • You can use a pill splitter to cut the beads in half or thirds for smaller dots.  These smaller dots will not take as long to bake- around 25 minutes. 
  • Allow a few minutes for the dots to cool before removing them from the parchment sheet.  If you move them while the beads are still warm, they can be misshaped. 
Finally, I thought I would share a card I made with these DIY enamel dots.


I used the dots to accent the center of some die-cut flowers.  I used a small glue dot to adhere them to the card. 


Would you like to try to bake up a batch of DIY enamel dots?  Let me help!  I will send an assortment of perler beads to the first three readers to leave me a comment.  US only this time, and please leave your email address so I can get in touch.  I can't wait to hear about your results!

Well that is all for me today.  I hope that you enjoyed my very first DIY Saturday.  I will be back next Saturday with another DIY tip or technique.

Katie


Wednesday, March 26, 2014

Stamp Out Chaos


Hello friends, 

Today is the start of a little something different here at Our Charmed Life.  For the next several weeks (months really), my dear friend, Lindsay, from Note to Self, and I are peeling back the curtain to share our journey towards a better organized and better functional crafty space.  We are calling it Stamp Out Chaos. 


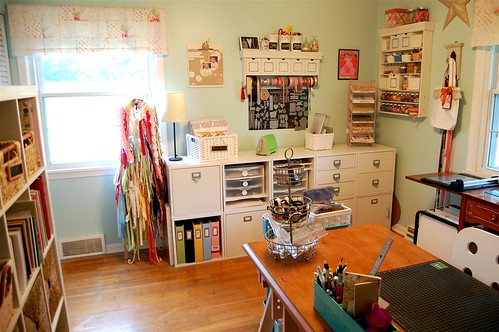
I am fortunate to have a dedicated room in our home where I can create and pursue crafty endeavors. A few short months ago it looked like this... mostly... it was particularly clean on the day I snapped these photos.  


While the space worked well overall, there were a few things that I wanted to tweak.  
  • Additional desk space in the form of an L-shaped unit. 
  • Carve out a dedicated spot for my laptop and printer (hence L-shaped desk).  
  • More drawers- my stash includes lots of bits and bobbles and I was tired of looking at everything all the time and drawers are handy to organize and put away.
  • Ribbon- I adored my dress form, but I haven't been using ribbon much lately and it was taking up a lot of space for a supply that was was not being used. 
  • Space for my Scrapbook/Project Life Albums.
So in November, I passed along my crop in style cubes and DIY desk to Lindsay and took a field trip to IKEA.  I purchased another 2 x 4 Expedit (which I stacked on top of my 4 x 4 unit), an L-shaped desk and many, many drawer inserts for said Expedit. 

And today, my crafty room looks like this (Warning: if messy rooms give you an eye-twitch look away now): 


I know.  It's bad.  Don't judge.  Well, judge if you must, just don't tell me about it.  ;)

So what the heck happened?  Well, a lot, and most of it ended up on my desk and some of it on the floor.  LOL!   I think what it comes down to is being in a huge hurry to get the space set up that I did not set up the space to fit my needs and work habits.  It's just not working and the effects are evident. 

In addition, there's a lot of change taking place in this small space...  I had to get a new laptop (hence the 2 computers on the desk), my old trimmer died and needed to be replaced and I started exploring new storage solutions for my ink, dies and cardstock- couple all that with school projects with the kids and limited crafty time, it's no wonder the room sort of threw up everywhere. 

Needless to say this is not an environment conducive to creativity without ample frustration, so I am on a mission to Stamp Out Chaos!  I long for a space that is simple, streamlined, and functional. 

Something like this: 


Or this- I adore the white with touches of pink. 


I love this bright and cheerful space.  I'm thinking about creating a focal wall in my space- more to come on that.


Change is not going to happen overnight.  This will be a journey, and I hope that you will find value in coming along for the ride.  Every other week, Lindsay and I plan to explore a different supply, share a few ideas along with the solution we chose to implement.  I would also LOVE your advice!  If you have any rockstar tips for keeping your space organized and efficient, please leave me a comment and let me know!  As you can see, I need all the help I can get!  

We will be tackling basic supplies in 2 weeks- think ink, cardstock, patterned paper and stamps.  I can't wait to get started and bring back some order and the joy to my crafty space.

Thanks for stopping by!
Katie 


Sunday, March 23, 2014

SPARKS Challenge: Smile

Hello friends, 

I hope you are having a lovely weekend!  Today, I am sharing a card I created for this week's Paper Smooches SPARKS Challenge.  This is week 4, so we are having a Designer Draft or Sketch Challenge and here's my take.

The two framed images stood out to me in the sketch and reminded me a bit of polaroid pictures, so I die cut 2 Polaroid Frames and created a couple dreamy water colored scenes with stamping and inlaid die cut clouds and hearts. The balloons are from Talk Bubbles (I drew in the string with a fine tip gray pen) and the Smile sentiment is from Scripty Sayings


I stamped the jar from Crystal Clear onto a Fine Linen card base and the polka dots from Geo-graphic on a strip of yellow cardstock. I layered the photo frames on top of each other and tied a bit of pink twine around the card as a finishing touch. 

Here's a look at this week's sketch:


You have until 11:59 PT on Saturday, March 29 to link up your take on this week's sketch to the Paper Smooches SPARKS blog for a chance to win a $30.00 gift certificate to the Paper Smooches store. Woot woot!  

Be sure to check out the amazing inspiration from the other members of the SPARKS design team playing along with this week's challenge: 


I can't wait to see what you create! Thanks for stopping by! :)
Katie


Friday, March 21, 2014

AEI{heart}U Challenge: Ombre

Hi friends,

Happy Friday!  It feels like we earned this one, right?  I am popping in today to share a card I made for the new AEI{heart}U challenge that starts today!

This time, our challenge is Ombre or Gradient and here is my take:


I used the scallop boarder from Fanfare to create a cascade of ombre scallops in shades of red, orange and coral at the top and bottom of my panel. Next I stamped and heat embossed Celebrate from Circle It with gold embossing powder. 


I matted the stamped panel on gold foil card stock and adhered the matted panel on a base made from white card stock. 


Now it's YOUR turn! Go make something awesome with your Avery Elle stamps or free digi that incorporates ombre and link up your amazing creation to the  AEI{heart}U challenge blog.  Be sure to check even more inspiration from the Design Team as well as all the challenge deets and deadlines while you are there too.  

Thank you so much for stopping by!  I can't wait to see what you create!!!
Have a great day!
Katie


Wednesday, March 12, 2014

Winner- Card Creations 12 Hop

Hello!

Just popping in to announce the winner of the Card Creations 12 issue...

Congratulations to Abbie Bryant!  Abbie, I have sent you an email!

Thank you to everyone who stopped by and for your sweet comments!

Have a great day!
Katie

Saturday, March 8, 2014

Winner- World Card Making Day Hop


Hello, 

Just popping in to announce the winner of the World Card Making Day Thank You Hop....

#76- Cheryl who wrote...
cheryl (clee') said...
Great way to use that die - very pretty card!
Cheryl, I'll be sending you an email, but feel free to reach out to me as well at scrappy_diva (at) yahoo (dot) com!  

Thank you to everyone who stopped by.  It was a lot of fun to play with the new card making supplies, and if you would like to try your hand at one of Paper Crafts & Scrapbooking Magazine's contest, they are accepting entries for the Stamping Royalty contest.  Click here for all the details.   Entries have to be postmarked by March 17, so get your crafty pants on and don't delay in getting your cards mailed in! 

I haven't been exactly knocking it out of the park with frequent updates to the blog and new fun projects to share.  Behind the scenes, I have been working on submissions for Paper Crafts'  Holiday Cards and More issue and a major overhaul of my crafty space.  Next up is paint... gulp... I am saying goodbye to the pale aqua and hello to a light gray and a fun stencil treatment for one of the walls....


I promise to share pics when it's complete! 

I don't want to sign off  without sharing a card so I thought I would share one of my most loved World Card Making Day "rejects."


I used some 1/2" paper scraps to build my background.  Next, I die cut a speech bubble (Avery Elle- Oh Yeah Elle-ments) on white cardstock and stamped Paper Smooches Notebook Paper.  Next, I stamped the sentiment and exclamation point from the Oh Yeah set. The arrow is from the Air Mail set.  Before adhering the stamped speech bubble to the card, I die cut another bubble from black cardstock offset it a bit to function as a shadow.  I really liked the contrast this provided.  A few enamel dots finish off the card.  

Well, that is all for me today!  Thanks for stopping by!
Katie


Friday, March 7, 2014

AEI{Heart}U Challenge: Embellish It!

Hello friends,

So this is my second post for the day.  If you are stopping by for the Paper Crafts and Scrapbooking Card Creations 12 hop, click here or just scroll down!

It's time again for another AEI{Heart}U Challenge.  This week's theme is Embellishments and here is my take:


I created my card base from Fog cardstock and covered it with a panel of Pixie card stock that I stamped with all the fun streamers and stars from Cake and Candles. Next on a project life journaling card, I stamped the cake stand from Fanfare in blue ink.  I topped the cake stand with a cake I "baked" using one of my favorite sentiments from Cake and Candles set stamped with red ink on Fizz card stock. I rounded the top corners of the cardstock to give it more of a "cakey" look  The candles atop the cake are from Fill in the Blank.


I embellished the candles with tiny pearls that I colored yellow with a Copic marker.  I mounted a strip of patterned paper and the stamped journaling card to the project and finished it off with a sprinkling of Citrus Blend sequins. 

I do hope you will be able to join us for this week's challenge!  Be sure to stop by the AE Challenge blog for all the details and to link up your take! I can't wait to see what you create!  

Thanks for stopping by!
Katie

Card Creations 12: Blog Hop + Giveaway!

Good morning!  

Today, I am participating in a special blog hop to celebrate the release of Card Creations 12 by Paper Crafts and Scrapbooking Magazine.  I am super thrilled to have six projects appearing in this issue.  I received my complimentary copy last week, and it's an amazing issue, seriously amazing.  Page after page of fantastic cards by many, many fabulous designers!  I am so grateful to be a part of this issue. 

You should have arrived here today from the ever talented Ashley Marcu's blog. If not, head over the the Plugged In with Paper Crafts and Scrapbooking blog to get the hop order. 

Each of the eight designers participating in today's hop was asked to create a card based on one of three sketches.  I have two cards to share with you today based off of the same sketch. For my first card, I went all high contrast and glitzy.    


I stamped and masked and stamped again the striped tile image from Avery Elle's Texture Tiles: Be Cool on a panel of white cardstock.  Because the image is a rectangle, it was super simple to mask with just some post-it notes, no fussy cutting involved! (Woot, woot!)


(all that glittery shiny stuff and my camera has a hard time focusing!)

I stamped and heat embossed the sentiment from AE's Simply Tags: Everyday with gold embossing power on a strip of black card stock.  I adhered some double sided tape behind the sentiment strip and sprinkled it with gold glitter for that extra touch of glam.  Some sequin stars added a finishing touch.

Next, I used the same background stamp, but switched up the colors for a more playful look.  


I die cut a panel from white cardstock and stamped the stripes with Hero Arts Shadow Inks in Fresh Peach, Soft Cantaloupe, and Tide Pool.  I spattered some gold spray ink on the cardstock.  I stamped Hello from Avery Elle's Modern Leaves onto a vellum banner and affixed it to the stamped panel. 


I sprinkled some gold sequins to keep the gold spatters company and adhered the completed panel to a craft card base. 

Here is a peek at the sketch I used: 


And both cards inspired by this sketch.  I super love how versatile sketches can be! 


In honor of Card Creations 12, the sweet folks at Paper Craft and Scrapbooking are allowing me to give away a free issue of the magazine.  


Just leave me a comment below for a chance to win by 8:00 PM EST on Tuesday, March 11.  A winner will be selected from all comments and announced here on Wednesday, March 12.  Please make sure that I am able to contact you through your comment profile or leave an email address.  It makes me so sad when I can't get in touch with winners! :) All are welcome to enter. International winners will receive a digital copy of the magazine. 

Next stop on the hop is the amazing  Vera Wirianta Yates.   And just in case you like to hop around in a random pattern, the entire hop list is below.  

1.       Chan Vuong
2.       Kalyn Kepner
3.       Ashley Marcu
4.       Katie Gehring
5.       Vera Wirianta Yates
6.       Alice Wertz
7.       Deena Boese
8.       Maria Fischer

Thanks for stopping by!
Katie

Sunday, March 2, 2014

SPARKS Challenge: Hi Sunshine!

Hello friends!

I hope that you are having a lovely weekend!  I am just popping in today to share a card I made for this week's Paper Smooches SPARKS challenge.  This week's theme is Anything Goes and here's my card:


It's been a long, cold winter here in Northeast Ohio and I am just done with this frigid weather.  I am ready to let the sunshine in!  I die cut the clouds on white cardstock and used the pinked circle dies to create a little sun. I adhered all the die cuts to a piece of blue polka dot paper. 


The sentiment and the smiley face are from the Spectrum set.  I added a few orange enamel dots as a finishing touch.


You have until 11:59 PT on Saturday, March 8 to link up ANY Paper Smooches project to the Paper Smooches SPARKS bloghttp://papersmoochessparks.blogspot.com/ for a chance to win a $30.00 gift certificate to the Paper Smooches store. Woot woot!  

Be sure to check out the amazing inspiration from the other members of the SPARKS design team playing along with this week's challenge: 


I can't wait to see what you create! Thanks for stopping by! :)
Katie

Saturday, March 1, 2014

World Card Making Day Thank You Hop+ Giveaway!

Hello friends!  

Happy first of March! Last fall, I entered a little contest for World Card Making Day held by Paper Crafts and Scrapbooking Magazine. I was so surprised and delighted that one of the cards I entered was selected as a winner in the Season's Greetings category.  My winning card was featured on the Plugged in with Paper Crafts and Scrapbooking blog a few weeks ago.  


Each of the winners received a prize box brimming with crafty goodies from many companies who were so generous to donate amazing products.  To express our thanks, and share the love, the WCMD gals decided to hold a little thank you hop.  We are each making a card in our winning category using some of the goodies we received.  You should have arrived here from talented Ilina Crouse's blog.   If you would like to pick up the hop from the beginning, please stop by the Plugged In with Paper Crafts and Scrapbooking blog

My category was Season's Greetings and I used Lil Inker Design's Spot On Stamp set and die to create this holiday card: 


I die cut several connected circles from white cardstock with the coordinating die and adhered the linked circles to a panel of patterned paper.  To the center of each circle, I adhered a stamped or patterned paper circle that I punched using a 7/8" circle punch.  I stamped "Celebrate" in red ink and added some hearts to the centers of the brown circles before trimming and mounting the patterned paper to the card with foam tape. 


Although, this is technically NOT a holiday set, by using the images and sentiment in conjunction with some holiday-themed pattered paper and I think this super versatile set pulled off "holiday" quite nicely! 

And I just so happen to have an extra Spot On set that I am giving away today!  


If you would like a chance to win this super fun set, just leave me a comment below by 8:00 PM EST on Friday, March 7, 2014. I will draw a winner and announce it on my blog on Saturday, March 8th.  International entries are welcome!  Please make sure that I have a way to get in contact with you by leaving me your email or having your own blog available from your comment profile.  

Next stop on the hop is Ms. Lil Inker herself, the incomparable, Laura Pryor

And just in case, the entire hop is listed below: 

Paper Crafts and Scrapbooking 
Alice Wertz 
Amy Kolling 
Asty Purbasari 
Dana Warren 
Erin Lee Schreiner
Heidi Lopez 
Ilina Crouse 
Katie Gehring 
Laura Pryor 
Lorraine Marasigan 
Maria Fischer
Miriam Prantner 
Trinh Arrieta 
Vera Wirianta Yates 
Veronica Zalis 


Thanks for stopping by!  

Katie