Friday, November 29, 2013

Shopping for inspiration- the holiday edition

Hello lovelies!

I am on the Neat and Tangled blog today sharing a holiday card inspired by my latest round of errands. It's no secret that I love shopping for inspiration when I am out and about, and I am popping in today to share a card I made inspired by holiday decorations at (my favorite store, like, ever) Target!

Last weekend, I was picking up the items on my Target list and somewhere between the kids clothes and shoes departments I looked up and saw this.


Those colors, the circles, the shine!  I was inspired!  I snapped a picture with my iphone trying not to look too conspicuous.  When I returned home, I pulled out some of my Neat & Tangled stamps to make a card based on this Target decor, and here's what I created... 


I stamped Sunburst with green ink on green cardstock and punched out the center of the image with my circle punch.  Party Dots was stamped with gold ink, and I punched a couple of small circles from the larger stamped image.

dsc_0080

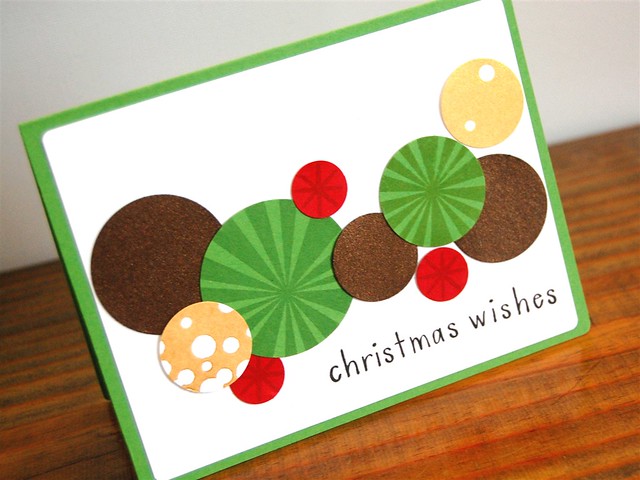
The stars from Merry and Bright accent the red circles and the sentiment is from Simple Christmas. A few circles punched from bronze shimmer cardstock added some depth and shine.

I think this card is pretty on Target with the inspiration (pun intended), and it's flat for easy mailing!  Next time you are out and about in all the hustle and bustle of the holiday season, don't forget to look around. Your next spark of inspiration could be hanging from the ceiling!

Thanks for stopping by!
Katie :)

Wednesday, November 27, 2013

Introducing Take a Number!

Hello!

Happy Wednesday!  Today, I am previewing another new set from Fresh Squeezed Stamps called Take a Number.


I used Take a Number and added the onesie from String Me Along to create a baby card.  I made a card from kraft cardstock and covered it with a panel of starry patterned paper from Studio Calico.  I stamped the sentiment and onesie image on a piece of white cardstock.  I added a border of teal, orange, yellow and aqua cardstock and a couple of black enamel dots. 

Be sure to stop over to the Fresh Squeezed blog to check out the other amazing projects created by the design team and for a chance to win this set.

Take a Number and Arctic Friends will both be available for purchase tomorrow morning in the Fresh Squeezed store!  Yay!

Thanks for stopping by!
Katie   


Tuesday, November 26, 2013

Introducing Arctic Friends!

Hello and good morning friends!

It's release week at Fresh Squeezed Stamps and today I get to introduce you to a darling new set called Arctic Friends.  Arctic Friends is a builder set where you can create your own chilly chums including a penguin, polar bear and walrus.

For my card, I decided to focus on the walrus and the accompanying sentiment. (I just love a good pun!)


I stamped and masked and masked and stamped the walrus again and again on a piece of white cardstock. The walrus/polar bear body was very simple to cut out and I made 3 masks from post it notes to create this group scene.  Once the stamping was complete, I outlined the walruses with a pale gray Copic Marker and added a pale blue shadow below the front line.

Next I stamped the sentiment, mounted the stamped panel on a piece of red cardstock and added some red and white baker's twine.  I adhere the matted panel onto a piece of aqua cardstock.

I love this design for a group card and will likely be using this for my daughters' teachers this holiday season. See that guy in the back row- there's one in every group, right?  I was thinking it would be super cute if each kid in a class decorated their own walrus for their teacher's card?  Hmmmm....

Be sure to stop by the Fresh Squeezed Stamps blog to check out the rest of the design team's creations! This set will be available for purchase on Thursday morning!  I will be back tomorrow with a sneak peak of another new Fresh Squeezed Stamps set.

Oh, before I go, this is the last week to enter your name for a chance to win a free spot in Kim Kesti's Big Picture Class: Create and Share Cardmaking. I am a guest designer!!  Leave a comment on this post (click link) for a chance to win!

Thanks for stopping by!
Katie

Monday, November 25, 2013

This Man is a Super HERO!

Hello friends!

Happy Monday!  Paper Crafts Magazine has a new special issue available this week called Card Creations for Him. Card Creations for Him is filled with oodles of clever card ideas for the special guys in your life.   I was lucky enough to get an advance copy as I have a couple of cards appearing in this issue.

This issue is, in a word my friends, AMAZING and it's only $5.99!  As I flipped through this issue, I had a huge grin on my face looking at all the fun and smart cards.

I wanted to share one of my cards that appears in this issue.  When I was creating for this publication, the movie Man of Steel was number 1 at the theaters, so I was trying to channel a Superman vibe.


I die cut a couple pennants and embossed this fantastic sentiment from Waltzingmouse Stamps. I trimmed one of the pennants and folded the pennants over a hanger clip (by Tim Holtz) to make a cape.   

You can check out a sneak peak of the issue here or purchase your issue from the Scrap and Paper Shop here.

That's all for me today!  Thanks for stopping by!
Katie 

Saturday, November 23, 2013

A CAS Christmas Card

Hello friends,

Just popping in today to share a card I have posted on the Fresh Squeezed Stamps blog today. I am sharing an idea for a clean and simple (CAS) holiday card using Trendy Triangles and Hello December.


I stamped 3 triangles from Trendy Triangles with green pigment ink on a piece of white cardstock and transformed them into Christmas trees with the addition of a tiny truck created from strips of brown cardstock and teeny wood stars.  I added a fun polka dot border using washi tape and stamped "hashtag" Christmas from Hello December. I rounded the corner of the white cardstock and adhered it to a kraft card base with foam tape.  My final step was to round the corner of the kraft cardstock base. 

I think the key with CAS Holiday cards (for me at least) is finding the balance between simplicity and easy production with accents, tools, and techniques that keep it interesting for the card maker and the recipient. The addition of the washi tape and those wooden stars add a lot of interest while not taking a lot of time. 

Well that's all for me today! Thanks for stopping by and have a great weekend!

Katie


Friday, November 22, 2013

Introducing Warm Wishes

Hello and TGIF!

Today's the big day!  All of the sets we have been previewing this week at Neat and Tangled are now available for purchase in the store!

The last item we are showcasing today is a digi called Warm Wishes.  I don't have a lot of experience working with digi sets, but I was truly surprise how easy it was to work with, resize, print, and use on my projects.


First up, I printed the sentiment on white cardstock, die cut it with a stitched circle die, mounted it on a doily and adhered it to a card.  I printed the cup on pink cardstock, trimmed it out and affixed it to the card with a bit of foam tape.  


You can also use this digi to dress up your holiday gifts.  Here the I created a tag to adorn a coffee bag. Before adhering the tag,  I stamped the bag band with the snowflakes from Santa's Notes.  Do you want to know what else? The Warm Wishes Digital Stamp is only $2.50 if purchased on its own, but it's FREE with any order placed from today, November 22- December 1 using the code WARMWISHES at checkout. 

Stop by the Neat and Tangled blog to check out the other projects using Warm Wishes. 

That's all for me today.  Thanks for stopping by!
Katie


Thursday, November 21, 2013

Introducing You + Me


Hello, hello!

I am back again today to share another fabulous set from Neat and Tangled.  All the products previewed this week will be available for purchase at the Neat and Tangled store on Friday, November 22 at 8 a.m. ET.

Please meet You + Me... 


For this card, I stamped the woodgrain boarder from On the Strip 2 on brown cardstock. Next I stamped and embossed the adorable heart with red embossing powder.  Next I stamped and heat embossed the arrow and sentiment with white embossing powder. 


Love how this tree turned out!  This is another crazy clever and versatile set. I adore all the possibilities from creating Venn Diagrams to flower petals to cutie hearts. 

Be sure to stop by the Neat and Tangled blog to see what the design team created and to enter for a chance to win this fun set.  

That's all for me today!  See you tomorrow! :)
Katie  

Wednesday, November 20, 2013

Introducing On the Corner

Hello friends,

I am back today to introduce another new stamp set from Neat and Tangled. All the products previewed this week will be available for purchase at the Neat and Tangled store on Friday, November 22 at 8 a.m. ET.

This one is called On the Corner, designed by the ever talented Miriam Prantner.  


For my card, I stamped the street post on white cardstock, and named my streets "Freaking" and "Amazing."  I stamped "You are on the corner of" on an aqua speech bubble. The patterned papers and wooded shapes are from Studio Calico.  

I can see so many possibilities with these stamps.  It's a seriously clever set!  (Plus everyone needs a stamp that says "freaking" in her stash.) :)

Be sure to stop by the Neat and Tangled blog to see what the design team created and to enter for a chance to win this fun set.  

That's all for me today!  See you tomorrow! :)
Katie   


Monday, November 18, 2013

Introducing Everyday Lables


Hello friends! 

Happy Monday and WELCOME to release week at Neat + Tangled.  Over the next couple of days, the Design Team will be showcasing the newest addition to the N+T collection. All items will be available for purchase at 8 a.m. on Friday, November 22 at the store.  First up is Everyday Labels.  Inspired by Danielle's love of her label maker, a love I also share, Everyday Labels features lots of words that you can mix and match to create sentiments perfect for many occasions. 


For my card today, I created a thank you note in black and white.  I stamped "thank" on white cardstock with black ink and "you" with Versamark on black cardstock and embossed with white embossing powder. (TIP: to ensure that your labels line up correctly, start with panels of cardstock a bit longer than what you need, and trim the excess once your images are aligned.) 

I added a couple enamel dots for a bit of contrast and interest, matted the card front on black cardstock and adhered it to a white cardstock base. 

Well that's all for me today.  Be sure to stop by the Neat and Tangled blog for more inspiration from our team! 

Thanks for stopping by!
Katie


Saturday, November 16, 2013

Fresh Squeezed Thanksgiving Swag

Hello and Happy Saturday!   

I am on the Fresh Squeezed Stamps blog today to share a little project that will be gracing my holiday table this year.

I offered to host Thanksgiving for my family at my house. This is a first for me and it involves my family making a 2+ hour drive over the river and through the woods to my house. I sent out an invite and in trying to figure out who was going to be able to attend, my younger brother (jokingly - sort of...) suggested that I needed to provide a little something to entice guests to make the journey.  :)

While I can't offer my guests gift bags filled with the latest designer goodies, I thought it might be fun to offer them a little something in the form of treats for the long drive home. I used the Subway Series: Holiday set to pull this project together.

To create my project, I first cut a piece of 12 x 12 kraft cardstock to 8 x 7.  I then used a Candy Box punch board to punch diamonds and notch both of the 7" sides of the cardstock. Next, I stamped the Thanksgiving subway stamp onto the cardstock multiple times.


Then I scored the stamped paper. 


I folded the paper into the candy box shape securing the edge with strong adhesive tape and tying the ends closed with some twine. I stamped the Thanksgiving subway tile onto cream cardstock, trimmed it out and matted it with maroon cardstock before adhering it to the candy box with foam tape.

The small box on the left was made from leftover cardstock that measured 5" x 7".  Perfect size for the kiddos!


Here's my Thanksgiving swag - striking a pose with a pumpkin.  After all the pictures I took, they may think that they have risen to celebrity status.  :)


Subway Series: Holidays

That's all for me today!  Thank you so much for stopping by and have a great weekend! 

Katie


Thursday, November 14, 2013

SPARKS Challenge: Welcome 2014!

Hello friends!

Is is too early for New Year's cards?  I hope not because I made one this week to play along with this week's Paper Smooches SPARKS challenge.  This week's challenge was to create a card based on a Designer's Draft sketch, and here is my take:


First I covered a kraft card base with some fun striped cardstock. I cut a panel of cream cardstock and stamped 2014 from the Digits set and then topped it with "welcome" from Simply Said in red ink. 


I stamped a strip of red cardstock with the polka dots from Geo-Graphic before rounding the corners and adhering the panel to the card with a bit of foam tape.  A strip of washi tape, a banner and a button with a glitzy center finish off the card. 

Here is a look at this week's inspiration sketch. 


That's all for me today!  Thanks for stopping by! 

Katie

Introducing Create and Share Card Making + Giveaway

Hello sweet friends,

A few months ago, the super talented Kim Kesti sent me an email asking me to be a guest designer and contribute a card design to a class that she is teaching this winter at Big Picture Classes. After I recovered from my initial shock, I learned that Kim's class is called Create and Share Cardmaking.  It is a 6 week course starting on January 2, 2014.  Here is the course description from the Big Picture Classes website.


Create & Share Cardmaking

Happy Handcrafted Greeting Cards for All Year Long

In a world dominated by digital communication, handmade greeting cards slipped into real paper envelopes and mailed the old-fashioned way have become more special, more rare, and more important than ever.

Start your year off right, getting the inspiration and the instructions you need to create 36 handcrafted cards in just 6 weeks! You'll also learn a proven system for organizing your finished cards, and you'll create a "happy mail kit" that makes it easy to share them with the people you love throughout the year.


Cardmaking all-star Kim Kesti will kick things off with a handy checklist to help you outline a year's worth of card needs. Then she'll inspire you with 12 videos, 12 card sketches, 12 cards from her guest designers, and 12 colorful handouts (each featuring step-by-step instructions by Kim for completing two cards as well as step-by-step instructions by a guest designer for completing an additional card).

Whether you're a beginning papercrafter, a seasoned cardmaker, or a scrapbooker looking to get more mileage from your stash of supplies, this interactive online workshop will reconnect you to the joy of cardmaking...and cardmailing, too.

WIN A SEAT IN THE CLASS!
Registration for the class is open right now.  I am super excited to be attending the class AND Kim is giving away a free seat to one of my blog readers!!!  To be entered for a chance to win a spot in the class, leave me a comment telling me your favorite type of happy mail to send or receive. I will accept comments through midnight ET on November 30, 2013 and announce the winner on my blog on December 2, 2013. Please make sure that through your comments or blogger profile, I have a way to get in contact with you if you are the lucky winner. :)  The contest is now closed. Good luck! 

My thanks to Kim for including me on this adventure! I can't wait for you to see the amazing cards that Kim and her team of guest designers created.  This is going to be a blast! 

Thanks for stopping by!
Katie

Sunday, November 10, 2013

Fresh Squeezed Stamps: Sleigh Parking Only

Hello friends!

Today is my first official post with Fresh Squeezed Stamps and I am popping in to share some inspiration using Hello December.


First I embossed a panel of light gray cardstock with a snowflake pattern.  Next I die cut a wavy shape from white cardstock to create a snow drift and parked a sled atop the snow. 


I stamped the parking sign with red pigment ink and trimmed it out leaving a small boarder around the edge.  I rounded the corners and adhered it with foam tape on top of a post I created from a strip of black cardstock.  I adhered the finished panel to a card base made from dark gray cardstock.  I love how the red parking sign really stands out against the neutral grays, black and white. 

Well, that's all for me today.  Thanks so much for stopping by! 

Katie

Saturday, November 9, 2013

Thank You Cath Blog Hop


Today, I am sharing a card I made for a very special member of the card making community.  Last week, Cath Edvalson of Moxie Fab World fame announced that she was stepping down from her post as Trends Editor at Paper Crafts Magazine.

Under Cath's leadership, the Moxie Fab World blog has been a beacon of style for the paper crafting community. With her knowledge of and appreciation for design, Cath can spot a trend from 6 months away.  Personally, I have learned so much about design, trends and style from Cath.  She has been a tremendous driver of my growth and development during my creative journey.  And the thing is, I am not alone in these feelings of appreciation. Cath's impact on the card making community has been profound and so the idea for this Moxie Fab Thanks blog hop was born.

You should have arrived here from the AMAZING Kryssi Ny's Mama Elephant Blog.  If you happened upon this post and would like to pick up the hop from the beginning, please visit the Moxie Fab World blog.

When I sat down to design my card, I tried to create a card worthy of everything Cath has taught me, and came up with this...

Triangular Thanks 2


I die cut triangles (lots and lots of triangles) from two shades of green cardstock and gold cardstock.  I adhered the triangles to a panel of light aqua cardstock, popping some of the gold triangles up with foam tape for interest. 

Triangular Thanks- close up

The sentiment is from Paper Smooches, Many Thanks set.  I stamped it on a strip of white cardstock, added a couple of black enamel dots and adhered it to the panel.  I matted the completed panel on black cardstock and adhered it to a white cardstock base. 

Although Cath may no longer be writing posts for Moxie Fab World, she continues to inspire. For a project worthy of Cath, I turned to Cath's Pinterest's board for design inspiration.  This card was inspired by this moxie fab pin from the All That Glitters is Gold board. 


Thanks for stopping by! Your next stop on the hop is the supper talented Angi Barrs.  

Thanks so much for stopping by!
Katie


Friday, November 8, 2013

SPARKS Challenge- Stripes

Hello friends,

Just popping by today to share my take on this week's Paper Smooches SPARKs Challenge.  This week's trend to watch is Stripes and here is my take:

PS- Holiday Cheer

I incorporated stripes in a couple different (but subtle ways) into my card.  First, the dark gray background was embossed with a chevron stripe pattern.  Is there a rule that stripes have to be straight?  I hope not!  

The second set of stripes is from the snowman's scarf.  I stamped and paper pieced the scarf onto patterned paper from Doodlebug Designs. 

PS- Holiday Cheer (close up)

Here is a look at this week's inspiration : 


You have until Sunday night at 11 p.m. EST to link up your approach!  
Thanks for stopping by!

Katie

Sunday, November 3, 2013

A crafty announcement

Good morning!

So I hinted yesterday that I would have an announcement to share.  I have been sitting on this news for quite some time, so I am super excited to share that I was invited to be a member of the Fresh Squeezed Stamps design team!

For the next few months, I will be creating projects for new releases, plus sharing inspiration weekly on the Fresh Squeezed Stamps blog. (I am the Saturday girl.) Anyway, I couldn't be more thrilled to be joining a group of super talented ladies, plus the owners, Ryann and Shannon, are super nice and fantastic to work with!

Click over the the Fresh Squeezed Stamps blog to say hello to the rest of the team.  :)

Thanks for stopping by! 
Katie  

Saturday, November 2, 2013

I can't believe it's already November!

Seriously, where does the time go?  I have some guilt over the gross neglect of my blog of late.  My days have been consumed by this....

ghost brain veggie cups

and this....
deconstructed caramel apples with m&ms


oh and a bit of this...

the angel and the little witch belong to me :)

So you are probably not interested in my excuses... The real reason for my post today is that I am popping in today to share a card I made a few weeks back for publication call.  It was not selected, so I get to share it here. :)

Recently, I have been challenging myself to create cards using basic supplies and not looking for the perfect ______ (insert holiday here) stamp set.  This is the Thanksgiving edition of these efforts.... a Pilgrim Card!


I created the card by using cardstock and dies (pennants, circles, squares and banners.  I adhered the white collar with a bit of foam tape to give it some dimension. Notice I didn't stamp or include a sentiment of any kind.  I thought the Pilgrim collar and shirt spoke pretty well for itself. 

Before I sign off, it is fully my intent to post and share more regularly this month.  In fact, I might be back tomorrow with a little announcement.  For now it's a secret, but I can't wait to share! 

Hope you have a wonderful weekend!  Thanks for stopping by!

Katie