Thursday, April 3, 2014

Take 2 Thursday- Watercolor Birthday Card

Hello friends!

Today starts another new adventure on Our Charmed Life- my friend and fellow card maker Lindsay Amrhein and I are starting a new feature called Take Two Thursday.  The premise is pretty straightforward...  Every other week, Lindsay and I will create and feature cards using the same stamp set.  We thought this would be a great opportunity to showcase the versatility of our stamps,  encourage us to stretch our supplies and make use of the stamps that we have welcomed into our stash.


For our first Take Two Thursday, we selected the Cake and Candles stamp set from Avery Elle and here is my card...


I know watercoloring is all the rage in card making and admittedly, I have been a bit slow on the uptake.  I am somewhat hesitant to invest in technique-y supplies unless I am absolutely certain that I know HOW to use it and WILL use it.  

After some experimentation, I was actually able to create my background with the help of a water brush and some old Stampin' Up reinkers that I held on to for a few years now.  Love finding use for older supplies!! I have another reinker watercolor card that I will be featuring later this week, and Saturday, I am planning to post a DIY tutorial about how I was able to achieve this look.  

After my background dried- very important!! I stamped my sentiment in black ink. 


The name of the set is Cake and Candles, so I added some candles in the form of some paper straws.  I interested a bit of baker's twine into each straw to represent the candle wick.    I tied a bow with some coral grosgrain ribbon and glue the bow to the "candles."

That is all for me today- be sure to visit Lindsay's blog, Note to Self, for her creation with this week's featured set.  

Thanks for stopping by!
Katie


Tuesday, April 1, 2014

Waffle Flower Crafts Design Team

Hello friends,

I am so excited to share with you today that I will be joining the Waffle Flower Crafts design team.  

Waffle Flower Crafts is a brand new company, founded by the adorable and oh-so-talented Nina Yang. I had the privilege of meeting Nina through the Neat and Tangled Design Team and got to know her better through the 2013 Stamping Royalty contest. I have long admired Nina's work and loved the stamps and dies that she created in partnership with Avery Elle. Now she is taking the next step by having her very own brand and company.  I am both honored and thrilled to be part of this journey and grateful to Nina for thinking of me. 


Nina has designed the most AMAZING stamps and dies for her very first release and she is introducing the first set today on the Waffle Flower blog. Yay!   

I have a sneak peak for you today in the form of a simple, but stylish card using the new 'Bowtiful' set. 


I made a card from navy blue card stock and adhered a panel of pink chevron patterned paper.  
I trimmed a scrap of white cardstock at an angle and stamped a sentiment on it with navy blue ink before adhering the white cardstock to the card. 


Next, I stamped and die cut one of the cute bows from the "Bowtiful" set and added a few sequins as a finishing touch.   I just love the color combination of pink, green and navy blue- so preppy and fresh- and how cute is that bow?!!  I have big plans for this set and can't wait to share even more ideas later this month!! 

Don't forget to visit the Waffle Flower blog today and all this week for even more introductions, previews and giveaways!  All of the products previewed this week will be available for purchase on Saturday, April 5th! 

Thanks so much for stopping by!  Have a great day!
Katie  


Sunday, March 30, 2014

A Tropical View Card

Hello friends!  

Happy Sunday! It's time for another Paper Smooches SPARKS challenge!!!  Since there are 5 Sundays in March, we are doing a bonus Anything Goes challenge, and here's my card: 


I stamped a panel of Raspberry Fizz cardstock with the chevron stripes from Geo-graphic.  Next, I die cut a pair of glasses using my Silhouette and created a little scene using Borders 1 dies, a circle punch, and the palm trees from Get Outta Town


I stamped the sentiment (also from Get Outta Town) in Versamark and heat embossed it with white embossing powder and attached the completed panel onto a kraft card stock base.  The kraft reminds me of a sandy beach! 


You have until 11:59 PT on Saturday, April 5 to link up your take on this week's sketch to the Paper Smooches SPARKS blog for a chance to win a $30.00 gift certificate to the Paper Smooches store. Woot woot!  

Be sure to check out the amazing inspiration from the other members of the SPARKS design team playing along with this week's challenge: 


That's all I've got for today!  Thanks for stopping by! I can't wait to see what you create! 

Katie

Saturday, March 29, 2014

DIY enamel dots


Hello friends, 

Happy Saturday!  Around our house, Saturday is typically the day that we attempt DIY projects.  You know, painting, refinishing furniture, cleaning out, decorating and the like.  I thought then that Saturday might be a good opportunity to share different DIY crafty projects and techniques as well.  

Last week, I tried my hand at the DIY enamel dot technique that has been floating around the paper crafting community. About a month ago, Betsy Veldman wrote a post on the Plugged in with Paper Crafts how she baked up a batch of enamel dots from pony beads. A few ingenious crafters took the technique a step further and tried melting enamel dots from Perler beads and shared their experience in a thread on the Two Peas in a Bucket community.   

Perler beads are widely found in kids crafts area of most major craft stores.  My daughters have quite the collection and use them to create various designs and creatures made from the beads and adhered together with the help of wax paper and an iron. 

Here is what you will need to try this technique at home: 
  • Perler beads in various colors
  • Oven or toaster over
  • Parchment paper- this is available at most supermarkets or in the fancy baking area of the crafty and hobby stores.  I found a roll at Michaels. 
  • Baking sheet
I have include some step- by-step photos, but please forgive the quality, I snapped them with my phone. 


Preheat the oven to 325 degrees and line a small baking sheet with parchment paper. and stand up the enamel dots on end.  


Bake the dots for 35 minutes.  Remove from the oven and allow to cool for a few minutes before removing from the parchment. Since Perler beads are meant to be melted, I did not notice any odor of melting plastic.

Voila!  Perfectly rounded enamel dots- don't they look yummy!


I also tried the technique with the IKEA Pyssla beads.  


I found that these beads did not melt as roundly or evenly as the Perler brand beads.


A few tips I learned and I thought I would pass along... 
  • Standing up the perler beads on end is a bit tricky.  Use a knife to carefully space them out.  They will spread out a bit when melting and if they are too close, they will conjoin.  
  • Darker colors- think black, blue, purple- will take a bit longer to melt.  I noticed a baking time of 45 minutes. If you take take the beads out and notice a dimple in the center, put them back in the over for 3-5 minutes and the dimple should smooth out. Do watch them carefully, because they can burn. 
  • You can use a pill splitter to cut the beads in half or thirds for smaller dots.  These smaller dots will not take as long to bake- around 25 minutes. 
  • Allow a few minutes for the dots to cool before removing them from the parchment sheet.  If you move them while the beads are still warm, they can be misshaped. 
Finally, I thought I would share a card I made with these DIY enamel dots.


I used the dots to accent the center of some die-cut flowers.  I used a small glue dot to adhere them to the card. 


Would you like to try to bake up a batch of DIY enamel dots?  Let me help!  I will send an assortment of perler beads to the first three readers to leave me a comment.  US only this time, and please leave your email address so I can get in touch.  I can't wait to hear about your results!

Well that is all for me today.  I hope that you enjoyed my very first DIY Saturday.  I will be back next Saturday with another DIY tip or technique.

Katie


Wednesday, March 26, 2014

Stamp Out Chaos


Hello friends, 

Today is the start of a little something different here at Our Charmed Life.  For the next several weeks (months really), my dear friend, Lindsay, from Note to Self, and I are peeling back the curtain to share our journey towards a better organized and better functional crafty space.  We are calling it Stamp Out Chaos. 


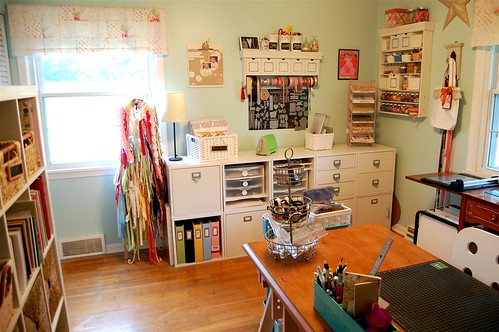
I am fortunate to have a dedicated room in our home where I can create and pursue crafty endeavors. A few short months ago it looked like this... mostly... it was particularly clean on the day I snapped these photos.  


While the space worked well overall, there were a few things that I wanted to tweak.  
  • Additional desk space in the form of an L-shaped unit. 
  • Carve out a dedicated spot for my laptop and printer (hence L-shaped desk).  
  • More drawers- my stash includes lots of bits and bobbles and I was tired of looking at everything all the time and drawers are handy to organize and put away.
  • Ribbon- I adored my dress form, but I haven't been using ribbon much lately and it was taking up a lot of space for a supply that was was not being used. 
  • Space for my Scrapbook/Project Life Albums.
So in November, I passed along my crop in style cubes and DIY desk to Lindsay and took a field trip to IKEA.  I purchased another 2 x 4 Expedit (which I stacked on top of my 4 x 4 unit), an L-shaped desk and many, many drawer inserts for said Expedit. 

And today, my crafty room looks like this (Warning: if messy rooms give you an eye-twitch look away now): 


I know.  It's bad.  Don't judge.  Well, judge if you must, just don't tell me about it.  ;)

So what the heck happened?  Well, a lot, and most of it ended up on my desk and some of it on the floor.  LOL!   I think what it comes down to is being in a huge hurry to get the space set up that I did not set up the space to fit my needs and work habits.  It's just not working and the effects are evident. 

In addition, there's a lot of change taking place in this small space...  I had to get a new laptop (hence the 2 computers on the desk), my old trimmer died and needed to be replaced and I started exploring new storage solutions for my ink, dies and cardstock- couple all that with school projects with the kids and limited crafty time, it's no wonder the room sort of threw up everywhere. 

Needless to say this is not an environment conducive to creativity without ample frustration, so I am on a mission to Stamp Out Chaos!  I long for a space that is simple, streamlined, and functional. 

Something like this: 


Or this- I adore the white with touches of pink. 


I love this bright and cheerful space.  I'm thinking about creating a focal wall in my space- more to come on that.


Change is not going to happen overnight.  This will be a journey, and I hope that you will find value in coming along for the ride.  Every other week, Lindsay and I plan to explore a different supply, share a few ideas along with the solution we chose to implement.  I would also LOVE your advice!  If you have any rockstar tips for keeping your space organized and efficient, please leave me a comment and let me know!  As you can see, I need all the help I can get!  

We will be tackling basic supplies in 2 weeks- think ink, cardstock, patterned paper and stamps.  I can't wait to get started and bring back some order and the joy to my crafty space.

Thanks for stopping by!
Katie 


Sunday, March 23, 2014

SPARKS Challenge: Smile

Hello friends, 

I hope you are having a lovely weekend!  Today, I am sharing a card I created for this week's Paper Smooches SPARKS Challenge.  This is week 4, so we are having a Designer Draft or Sketch Challenge and here's my take.

The two framed images stood out to me in the sketch and reminded me a bit of polaroid pictures, so I die cut 2 Polaroid Frames and created a couple dreamy water colored scenes with stamping and inlaid die cut clouds and hearts. The balloons are from Talk Bubbles (I drew in the string with a fine tip gray pen) and the Smile sentiment is from Scripty Sayings


I stamped the jar from Crystal Clear onto a Fine Linen card base and the polka dots from Geo-graphic on a strip of yellow cardstock. I layered the photo frames on top of each other and tied a bit of pink twine around the card as a finishing touch. 

Here's a look at this week's sketch:


You have until 11:59 PT on Saturday, March 29 to link up your take on this week's sketch to the Paper Smooches SPARKS blog for a chance to win a $30.00 gift certificate to the Paper Smooches store. Woot woot!  

Be sure to check out the amazing inspiration from the other members of the SPARKS design team playing along with this week's challenge: 


I can't wait to see what you create! Thanks for stopping by! :)
Katie


Friday, March 21, 2014

AEI{heart}U Challenge: Ombre

Hi friends,

Happy Friday!  It feels like we earned this one, right?  I am popping in today to share a card I made for the new AEI{heart}U challenge that starts today!

This time, our challenge is Ombre or Gradient and here is my take:


I used the scallop boarder from Fanfare to create a cascade of ombre scallops in shades of red, orange and coral at the top and bottom of my panel. Next I stamped and heat embossed Celebrate from Circle It with gold embossing powder. 


I matted the stamped panel on gold foil card stock and adhered the matted panel on a base made from white card stock. 


Now it's YOUR turn! Go make something awesome with your Avery Elle stamps or free digi that incorporates ombre and link up your amazing creation to the  AEI{heart}U challenge blog.  Be sure to check even more inspiration from the Design Team as well as all the challenge deets and deadlines while you are there too.  

Thank you so much for stopping by!  I can't wait to see what you create!!!
Have a great day!
Katie