Showing posts with label Studio Calico. Show all posts

Thursday, November 27, 2014

Nuts About You {Take 2 Thursday}

Hello and Happy Thanksgiving to my US friends!

Today my pal, Lindsay, and I are sharing another rendition of Take 2 Thursday and this week we are playing along with Studio Calico's November card kit.  Here's my take:


Even though acorns are very much a fall icon, I went for a non-traditional color scheme with the black, glass slipper and clean slate ink. 


I added a cluster of leaves, small "Xs" that were included in the October card kit stamp set and small dots at the top of the stamped panel.  I stamped the sentiment in black and adhered one of the wood veneer hearts included in the card kit.  Once the panel was completed, I adhered it to a gray card stock base.  

Here's a look at the November card kit- Walden- just in time for the December kit reveal!  


Be sure to stop by Lindsay's blog today to check out her take using the kit.  I know it will be amazing! 

Edited to add: So Lindsay sent me a note to advise that she is running a bit behind today with her post.  Something about a turkey and not ruining the holiday for her family-LOL! Her post will be a delayed, but you should stop by her blog anyways because it's awesome!   It's up now!  Go see and enjoy! :)

Thanks for stopping by! 
Katie

Thursday, September 25, 2014

You're a gem {Take 2 Thursday}

Hello, hello friends,

Happy Thursday!  Lindsay and I are back today with another Take 2 Thursday.  This week we are using the Poet Society Card Kit from Studio Calico.  I have been a Studio Calico subscriber for 7 months now, and I have to say that the stamp set included in the September kit is hands down one of my favorites- jewels, banners, a fancy font and sentiments for a variety of occasions- what's not to love?!  Anyway, here's my take with the kit:


I made a card from white card stock.  Next I die cut a circle from a panel of 4.25 x 5.5" white card stock.  I aligned the die cut panel with the card front and used a pencil to trace the circle on my card.  I stamped the sentiment first in black ink. 


Next, for the gems and jewels, I employed the "two step stamping with one step stamp" technique.  In other words, I inked up and stamped the back side of the stamp before stamping the lined image on top.  This technique works well with almost any symmetrical stamp.  I am not great at coloring, so this allows me a fast and easy way to get some color to my lined images.   

Once I stamped the larger images, I filled in the design with a few of the smaller gems and stars.  I erased the pencil line and adhered the die cut panel to the card with foam tape. 

Here's a look at the Poet Society kit: 


That's all for me today, but please be sure to visit Lindsay's blog to see what she created with this kit.  I know it will be amazing! 

Thanks for stopping by!
Katie


Thursday, August 21, 2014

Take 2 Thursday (Studio Calico Sandlot)

Hello friends,

Lindsay and I are back today for another Take 2 Thursday with cards we made from the Studio Calico Sandlot card kit.


One of the main images included in the kit stamp set is a darling image of a bubblegum machine- seriously- it's sooo cute and imagine filling it with enamel dots or sequins.  But I decided to focus on some of the smaller sentiments/images in the set and let some of the other kit elements help me out.

First up, a card with a definite back to school vibe.  I made a card base from white card stock and covered it with a panel made from the black and white triangle gem patterned paper.  I trimmed the lined patterned paper and stamped the sentiment towards the bottom of the panel.  I colored the inside of the letters with yellow marker to give it that chic highlighter look.


For the sequins, I feel like I don't always do random very well, so I used a Heidi Swapp stencil (the one with the stars, hearts and circles) to assist with placement.   I attached a circle clip and adhered it to the card. I am still not sure that I love the sequins, but that ship sailed when I pulled out that tube of Tombow glue.  I am sure one of the girls will appreciate it tucked in their lunch sacks nonetheless. 


Next up was a card soooo easy, I feel like I am cheating by sharing it with you.  I really loved the kaleidoscope looking patterned paper included in the kit paper pack.  I trimmed it so that the focal intersection would fall in the card's "sweet spot" and adhered it to a pink card base.  I toyed with stamping the sentiment on a shape and adhering it to the card, but in the end, I decided to stamp "thanks" directly along one of the color lines.


I added a few enamel dots and a strip of black and white polka dot washi tape to further anchor the design. 


Here's a look at the Sandlot kit: 


See that kitty wood veneer- I've got big plans for that baby...but that's a project for another day. ;)

Be sure to stop by Lindsay's blog today for her take on this kit.  I KNOW she came up with something amazing!  

Thanks for stopping by!
Kate


Monday, August 4, 2014

We Must Ketchup {A Month of Neglect}

Hello and Happy Monday!

I am back today with another card to share today in my ongoing Month of (Stampy) Neglect.   This time I am using the Churros stamp set from Studio Calico.

I started with a kraft card base and covered the front with a piece of patterned paper.


I stamped the tomatoes in Hero Arts Fresh Peach ink and the blush circles in Sweet Gelato from W Plus 9 on a piece of white card stock. I added the stem leaves in Hero Arts Field Greens and the sentiments in Versafine Black Ink. 


I matted the stamped card stock on a piece of green card stock and adhered it to the card.


Well that another stamp set down and many, many more to go! 

Thanks for stopping by! 
Katie

Thursday, July 31, 2014

A Consumer Relapse {Stamp Out Chaos}

Hello friends,

So, it's been a moon or two since Lindsay and I did a Stamp Out Chaos post.  No we didn't abandon the effort.  We have been working on finishing up some bigger projects in our spaces, and it's summer- you know where the call of spending a lovely day outside with the family is more powerful than a siren's song.

I thought I would pop in today with a post to share the current state of affairs in the crafty space.   A few months ago, I had the epiphany that one of my biggest challenges to organization was that I simply owned too much stuff.  It was suffocating me and seriously impeded my creative efforts.  So I purged.  Boxes upon boxes of crafty supplies left my room and were donated to the school, to daycare and some were even sold.

This made all the difference in my space.  Sure there was more work to be done and of course more could (and will) eventually go, but simply freeing up some valuable real estate from items that were in excess, no longer fit my habits, or my style was an absolute game changer.  Rational minimalism was the way to go.


But then something happened...

Looking back, it started in June with the Father's Day weekend sales, continued through July 4th sales, a couple "must-have" new releases from favorite stamp companies, and an online shop's moving sale (40% off people!).  After not making many crafty purchases over the past several months, I had a full-on consumer relapse.  I engaged in the online equivalent of "shopping until I dropped." The padded envelopes started arriving at the house and stuff started creeping it's way back into my little crafty space.

In one way, the delayed gratification and waiting for these sales allowed me to acquire many sets that had been on my wish list, but as a result of all my new acquisitions, the craft room equilibrium shifted and my space was teetering on the bring of chaos once more.

What I came to realize is that as much as my initial goal when I started this journey was to organize my room "once and for all," that's really not how it works.  Do we unload the dishes once and for all?  Vacuum once and for all?  Nope, these are daily/weekly maintenance tasks we (begrudgingly at times) perform to keep our homes running smoothly.  It's the same with creative spaces. It's never done. Maintenance will be necessary to keep the space functioning at an optimal level.

So what's to be done? Two (really three) things...  

The Great Purge- Part IX
As new stamps have arrived, I took an opportunity to go through my stash of supplies and pull out those that have not and are not being used.  I am in the process of listing them for sale online where I hope that they will be able to find new and happy homes.

A Month of Neglect
As I mentioned in an earlier post, there is nothing inherently wrong about crafty purchases.  New products are inspiring and they help fuel this creative industry that we all love.  The problem happens when the items are purchased and not used.  I have many, many sets that I purchased and still love (in other words, I am not ready to let them go), but I need to put them to use.  So to address the horde of unused stamps and supplies in my possession, I am declaring August 2014 as a Month of Neglect.  I will be devoting most of my blog posts in August to stamp sets that have seen little to no inky action.


It is my hope to post daily or nearly daily to share projects created with my (previously) unused stash of stamps.  I hope that you will continue to pop in to see what I have been up to!  The fun starts tomorrow, August 1.

Learning  
I also signed up for an organization class called Workspace at Studio Calico.


The class is being taught by Marcy Penner and starts August 4.  Enrollment ends tonight at 11:59 PM EDT.  I hope that between letting go of more excess, using what I have and seeing some new ideas through the class, I can continue my mission to Stamp Out Chaos.  

Thanks for stopping by!
Katie

Thursday, July 24, 2014

So Happy for Hedgehogs {Take 2 Thursday}

Hello, hello!

Lindsay and I are back today with another Take 2 Thursday.  This week, we are using Studio Calico's Penny Arcade July card kit.


There were sooo many cute images in this stamp set from the happy cloud to the gnome, but I decided to use the hedgehogs to create a sweet baby card.


First I stamped the hedgehog parents in brown ink on a panel of white cardstock.  The best part is that no masking was involved!  The hedgehog baby was next followed by some pink mushrooms. 


I adhered the stamped panel at an angle to a piece of patterned paper covering a white card base.  I stamped the sentiment in brown and added the YAY stripes in pink.  Since it's a baby card, I couldn't resist adding a cute yellow button to the corner of the stamped panel. 

Here's a look at the Studio Calico July kit: 


Be sure to stop by Lindsay's blog for her creation with this fun kit!  That's all for me today!  Thanks for stopping by!

Katie


Thursday, June 26, 2014

Take 2 Thursday- Studio Calico Hello Hello

Hello, hello friends and Happy Thursday!

Lindsay and I are back for another Take 2 Thursday and this week, we are playing with the June Card Kit from Studio Calico called Hello Hello.


After my beloved Archivers closed earlier this year, I picked up a subscription to two kit clubs to have a way to infuse some newer crafty items into my supply stash each month.  It's been fun getting a box of inspiring goodies with a selection of patterned papers and embellishments. Any items that I don't see myself using, I plan to sell or give away to keep my supplies at a manageable level.

Of course, my favorite part of any kit is the stamps, so playing with the Hello Hello stamp set, I created two cards. First up, a floral thank you card.  I used some of the shapes in the stamp set to create some flowers and leaves.


I stamped the flower centers in black and added a black enamel dot to the center.  I stamped the sentiment in black ink and adhered the panel to a kraft card base. 


Next up is a more graphic card using the polka dot stamp.  I stamped the dots across the card front in rainbow shades of ink.  I alternated the direction of the stamp and it created the fun zig-zag pattern. 


I matted the stamped panel with black cardstock  and adhered it to a green card base.  


I stamped the sentiment on a strip of paper and adhered it to the card with foam tape. 

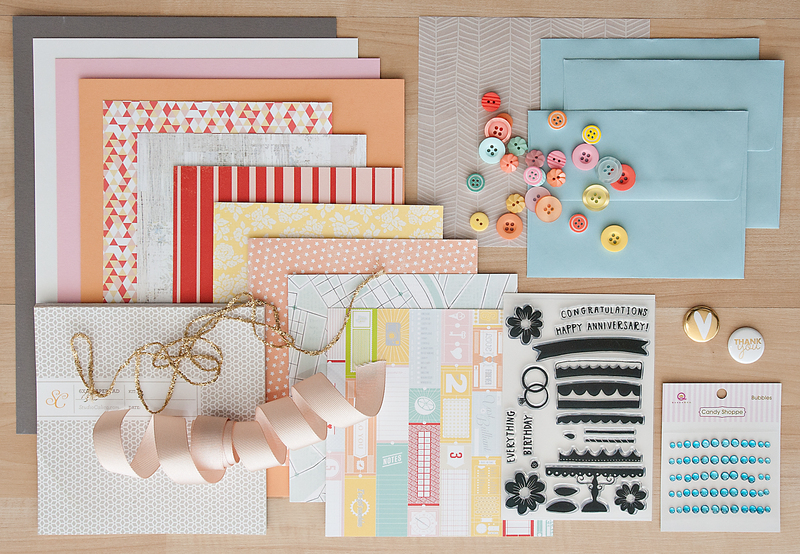
Here is a look at the June kit- I think there some still available at the Studio Calico store. ;o)


Well that's all for me today.  Be sure to stop by Lindsay's blog to see her fantastic work with this kit.  

Thanks for stopping by!
Katie


Thursday, May 29, 2014

Take 2 Thursday: Studio Calico Camelot Card Kit


Hello friends, 

Lindsay and I are back for another installment of Take 2 Thursday.  This week we are playing with the Camelot Card Kit from Studio Calico. 


I LOVE this kit and came up with two card projects to share with you today.  First up is a simple Happy Birthday card: 


For this card, I stamped the striped candle image repeatedly across a panel of white cardstock.  I added the flames with yellow ink and stamped the sentiment in black ink.


I rounded the corners and adhered the completed panel to card base that I created from a piece of Citrus Slice card stock.  

Next up is a one layer card that would be perfect for a spring or summer wedding. 


I made a card base from a piece of cream card stock and rounded the bottom corners.  I started by stamping the cake stand with some Gold Delecata ink and next I stamped the sentiment in black ink.  I added a couple layers of cake and clustered the flowers as a cake topper. 


A few cream colored sequins are a finishing accent.

Well that is all for me today, be sure to stop by Lindsay's blog to see the gorgeous card she created with this kit.  

Thanks for stopping by!
Katie 


Thursday, May 15, 2014

Take 2 Thursday: Studio Calico Get Well Card


Hello friends, 

I can't believe that it's already Thursday!  Where has this week gone?  My friend Lindsay and I are back today for another Take 2 Thursday.  This week, we are using the stamp set from Studio Calico's March 2014 kit- Office Hours and here's my take: 


I never seem to have enough Get Well cards in my stash and unfortunately, need for Get Well wishes often arise without warning, so I need to do a better job of keeping them on hand.  This card is a step in that direction. 


I stamped and masked the clouds and added colorful raindrops, plus signs and umbrellas.  I stamped  the sentiment at the very bottom of the panel with gray ink.   I adhered the stamped panel to a piece of adhesive backed cord that I had attached to a Fine Linen card base.  I added a heart-shape wood veneer that acts as a push pin. 

Well that's all for me today, be sure to stop by Lindsay's blog to see her take with this kit.  

Thanks for stopping by!
Katie