Showing posts with label Shaker card. Show all posts

Tuesday, March 16, 2021

Looking for Rainbows?

Hello friends, 

Are you looking for rainbows? I am! Always! I am on the Avery Elle blog this week with a couple rainbow cards to share featuring the Happy Birthday Die and Look for Rainbows clear stamps. 

First, I made a shaker card with the Happy Birthday die. I blended Distress Ink on a panel of Distress Heavystock and die cut the Happy Birthday greeting. 


Next I made a shaker element with the Oval Burst Elle-ment die using lots of sparkly clear sequins! I attached the shaker to a notecard covered with a piece of patterned paper. I adhered the rainbow die  to the shaker and added a few clear flat sequins as a finishing touch. 


My next rainbow card uses the aptly named Look for Rainbows set. First I created the rainbow background with  a cloud edge stencil and Distress Inks. Next, I stamped the Bunny, puddle, and water drops and colored them with Copic Markers. 


I die cut the stamped images with the coordinating Elle-ments dies and arranged them on the background. I adhered the panel to a notecard and stamped the sentiment with black ink. 


Supplies

I hope these rainbow cards brightened your day! Thanks for stopping by!

Katie

Monday, October 14, 2019

Cloche Shaker Card {Avery Elle}

Hello friends,

I am on the Avery Elle blog today with a card featuring the Cloche stamp set. I love cloche jars for creating vignettes and highlighting special objects, and you can do the same thing with stamped images using the Cloche clear stamps.


I used the Cloche stamp set and coordinating Elle-ments die and created a shaker jar. Before sealing the shaker element, I blended some blue ink on the back panel and added a few pinches of coarse glitter.  I stamped the flowers from the Cloche stamp set along with one of the snowmen and bird from the Snow Fun stamp set. I colored the images with Copic markers, added them to the jar and tied a bow with Cherry Hemp Twine as a finishing touch.


I trimmed the blue snowfall paper from The Holiday Collection paper pack and adhered it to a navy A2 card base. I adhered the scalloped frame from the Holiday Ephemera pack and attached the cloche image to the card. Finally I added one of the sentiment banners from the ephemera pack to the cloche jar.

Supplies:

That's all for me today! Thanks for stopping by!
Katie

Monday, April 8, 2019

Cake for All Shaker Card + Video {Avery Elle}

Hello!

I am a little behind in sharing a card and video I put together using Avery Elle's awesome Cake for All stamp set and the Scalloped Mat Elle-ments die.

Using the Scalloped Mat die and some adhesive-backed fun foam, I made a shaker window that I filled with clay sprinkles.


I heat embossed the images from Cake for All using Rose Gold Embossing powder and colored them in using Zig Clean Color Real Brush Markers.  Zig Colors- Pale Pink, Light Carmine, Light Blue, Lilac, Light Green and Pale Green.


Take a peek at the video to see how it all came together.  


Supplies: 

Thanks for stopping by!
Katie

Tuesday, July 31, 2018

Big Birthday Shaker Card + Video {Avery Elle}

Hello friends,

Katie here with a card and a video to share with you today featuring Avery Elle's Big Birthday Clear Stamps and the Focal Point Stripes Elle-ments die.


I used wire snips to separate the inner stripes of the Focal Point Stripes die from the outer rectangle and die cut a card panel using the stripes portion of the die to create a shaker window.  I stamped the sentiment at the top of the card and added lots of Avery Elle's Coarse Glitter and other shiny things to the shaker pocket.

A few yellow sequins transformed the stripes into birthday candles and a bit of Hemp Twine adds a finishing touch.


I hope you'll take a peek at my video to see how it all came together.   Don't forget to subscribe to Avery Elle's You Tube channel!

Wednesday, June 13, 2018

Peek-A-Boo Pals Birthday Shaker Card {Avery Elle}

Hello friends,

Just popping in today to share a colorful birthday shaker card to share with you today featuring Avery Elle's Peek-A-Boo Pals stamp set and the Focal Point Stripes Elle-ments die.


First I die cut the Focal Points Stripe die from watercolor card stock.  I removed each strip and added color using Distress Oxide inks.  I spritzed the inked stripes with water and allowed them to dry. Next I stamped the sentiments from Peek-A-Boo Pals onto two of the stripes.  The stripes coordinate perfectly with the sentiments in Peek-A-Boo Pals.


I assembled the shaker element, adding some Avery Elle Coarse Glitter and clear star sequins before sealing it closed with foam tape.  I stamped the elephant and panda from Peek-A-Boo pals and colored them with Copic markers.  I nested the animals along to bottom edge of the shaker window and adhered their paws to the card with foam tape.

Supplies

Be sure to check out the Avery Elle blog this week for even more inspiration featuring the Peek-A-Boo Pals stamp set!

Thanks for stopping by!
Katie

Saturday, November 18, 2017

25 Days of Christmas Tags

Hello friends, 

We are getting closer to the holidays and things are definitely taking a festive turn around here.  The kids have written their Christmas wish lists and my favorite radio station made the switch to all holiday music!    


Tracey McNealy's 25 Days of Christmas Tags is a fabulous way to jump start my holiday crafting and I have a pair of fun shaker tags to share today featuring products from Avery Elle.


I stamped the sentiment and a few snowflakes onto the back panel of the shaker tags before filling with clear sequins and assembling them.  I stamped and colored the Snowmen images with Copic Markers and tied a bit of Midnight Hemp Twine at the top of each tag to finish them off. 


I think these tags turned out pretty cute and I can't wait to attach them to some special gifts this holiday season. 

Supplies: 

For more information about the 25 Days of Christmas Tags, check out Tracey's blog!

Thanks for stopping by!
Katie


Friday, April 14, 2017

Happy Birthday Shaker Card {Avery Elle}

Hello friends, 

I am on the Avery Elle blog today sharing a card featuring the Scalloped Pierced Rectangles Die along with the Time to Party stamp set and coordinating Elle-ments dies.  Links to all my Avery Elle supplies are below. 

The Scalloped Pierced Rectangles dies make the most awesome frames with amazing detail.  I used the dies to create a shaker card that I will give to my youngest daughter for her birthday is a few months.  Double digits y'all! 


I die cut a panel of aqua card stock with the die and created a shaker window using acetate and foam tape.  I filled the window with sequins and carefully attached it to a white note card. 

On top of the acetate window, I added a frame cut with the Scalloped Pierced Rectangle dies from white card stock.  I stamped the cake image from Time to Party onto watercolor card stock.  I added a light wash of watercolors with my Zig Clean Color brush markers, die cut the image and adhered it to the card. 


Supplies:

Well that's all for me today, but be sure to stop by the Avery Elle blog for even more inspiration from the Avery Elle design team! 

Thanks for stopping by!
Katie

Friday, November 4, 2016

A Christmas Chalet {Avery Elle}

Hello friends!

It's Fri-yay!!! Woo-hoo!  It's been a busy week around here. I'm still a little sleep deprived from watching lots of baseball,  but I had to pop in super quick to share my latest Avery Elle card using the Chalet stamp set and coordinating Elle-ments dies.


The Chalet stamp set reminds me of a picture perfect holiday home that you might see in a snow globe.  I tried to capture that feeling by making a shaker backdrop for the card.  The house and tree were colored in using Copic Markers and I added some Stickles to the roof, window sills and tree to create a little snowy sparkle.  All of the Avery Elle supplies I used on this card are linked below:


That's all for me today, but be sure to stop by the Avery Elle blog for more ideas and inspiration.  I will be back next week with a card to share using Avery Elle's new Winter Release!  I'm excited to show you all the cute and clever things in store for in the coming months!

Thanks for stopping by!
Katie 


Friday, June 24, 2016

Avery Elle Inspiration x 3

Hello friends, 

Happy Fri-yay! I am on the Avery Elle blog today with a trio of fun cards using stamps sets from Avery Elle's summer release.  All of my Avery Elle products are linked below each project. 

First up is a card using The Scoop stamp set.  I envisioned a sweet shaker card in shades of pink and pistachio.  I changed the look of the truck by drawing a line to section off the bottom of the truck and adding one of the large ice cream cones as a roof ornament.


Supplies

Next, a card featuring the very funny That Bites stamp set.  These fish are so awesome on their own, so I added a fish to a watercolored background panel.  I used the bubbles and waves dies included with the coordinating die set to add a little interest to the background. 


Supplies:

Last is a card featuring the Ribbit Ribbit stamp set.  I created another watercolored background for these frogs and their lily pads.  The speech bubble die came from the Stoker Ellements die set. 

Supplies:
New Moon Dye Ink Pad

Well, that's all for me today, but be sure to stop by the Avery Elle blog for more inspiration from the Avery Elle Design Team.  Thanks for stopping by!

Katie

Friday, May 15, 2015

Birthday Bunny Shaker Card {Avery Elle}

Hello friends, 

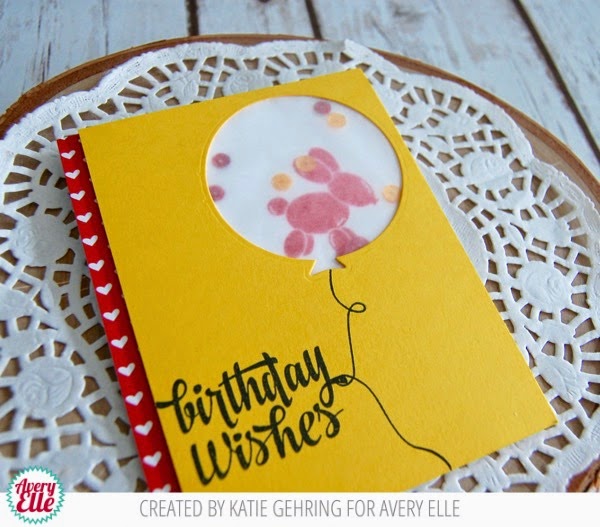
I am on the Avery Elle blog today with this fun card featuring the Party Bunny stamp set.  I die cut a large balloon from the Balloons Elle-ments die set and used it to determine the placement of the party bunny which I stamped in Cherry ink on a white notecard. 


I covered the balloon die opening with white tissue paper and added a few red and yellow sequins to make a shaker card. 


The red heart patterned paper is from The Jewel Collection paper pad and the sentiment is from the Sending You stamp set.  

Well that's all for me today, but be sure to stop by the Avery Elle blog to check out a card made by my sweet and talented teamie, Karolyn Loncon!  

Thanks for stopping by!
Katie

Monday, January 5, 2015

Waffle Flower DT Mix Blog Hop

Hello friends!

Well, the holidays are officially over and it's back to the regular routine this week, but today is special because we have a particularly special stamp set in the latest Waffle Flower Crafts release.

Last fall, Nina reached out to the team and invited us to contribute a design or concept to a stamp set. We sent in our ideas and here's the result: the DT Mix Stamp Set!


My contribution to the set is the "Shake it off" sentiment.  I love the song  Shake it off by Taylor Swift.  It was my favorite earworm of 2014.  I thought that it would make a fantastic sentiment for a card because the truth is that we can all use this reminder from time to time...

It also seemed only appropriate that I make a shaker card using the Shake it off sentiment.


On a panel of white card stock, I stamped the plus sign pattern from the Pattern Play stamp set, then I die cut a circle for the shaker window.  I covered the circle with acetate and bordered the die cut opening with foam tape.  I poured in gold micro beads and backed it with white card stock. 


I stamped the Shake it off sentiment on white card stock with Versamark and heat embossed it with gold embossing powder.  Once cooled, I punched the embossed sentiment from the card stock with a 1.5" circle punch.  I added a few gold accents in the form of some enamel dots and a wood veneer arrow.  I matted the panel with black card stock and adhered it to a white card stock base. 


Here's the Shake it off card, shaken up.  The micro-beads make for a fun shaker element and are rhythmic too!

Giveaway
Well you can't have a blog hop without prizes, and Waffle Flower Crafts is providing a stamp set of choice as a prize for this hop! The random winner will be drawn from comments left on all of the Design Team blogs! Enter by 11:59pm Eastern on Thursday, Jan 8. The winner will be announced on the Waffle Flower Blog on Jan 9.  Your next stop is my talented teamie,  Kim Kesti and the entire hope order is below:

Hop Order
Katie Gehring - you are here!

New products are now available at waffleflower.com!

Good luck! Happy Crafting!

Katie

Friday, August 22, 2014

Sequin Shaker Birthday Card {AE Challenge}

Hello friends!  

Well we made it to the end of another week and this Friday is super special because we are kicking off another Avery Elle I {heart} U challenge.  This week's challenge is sequins.  I assume you might have one or two laying about your crafty area right? ;) Here's my take on this week's challenge:

Shaker cards seem to go hand in hand with the whole sequin-craze, so I decided to create a simple shaker card for the challenge.  First, I trimmed a piece of patterned paper from Avery Elle's new Brights Collection patterned paper pad the same size as my card front. Next I die cut a circle in the center of a panel and adhered a piece of acetate to the back of patterned paper panel.  I created a foam tape border around the die cut and carefully poured in some sequins.  I knew I wanted some stamping to be visible in the circle, so I was careful not to add too many sequins.  


I trimmed a piece of thin white card stock a bit larger than the circle and stamped birthday from Simply Said: Happy stamp set and tried as best I could to adhere it so that the stamped sentiment would be appear straight across the card. 


I adhered the finished and sealed panel to a white card stock base using a bit of foam tape in the corners and across the bottom so the card was evenly popped up. Finally, I die cut happy using the Happy Elle-ments die from Fizz card stock and adhered is across the shaker circle. 


Well that's it for me today. Be sure to stop by the AEI{heart}U blog for even more inspiration from the design team and to link up your take on this week's challenge.  I can't wait to see what you create!
Thanks for stopping by!
Katie

Friday, July 25, 2014

Happy Birthday Shaker Balloon {AE Challenge}

Hello friends and TGIF!

Today starts another AEI{heart}U challenge and this week's challenge is "to die for."  Not literally, please, but we do want to see you use die-cuts on your entries.  Here's my take:


I was trying to create the look of a confetti-filled balloon like these. So I die cut an angled panel using the Custom Panels ELLE-ments dies.  Next, I die cut one of the balloons from the Balloons ELLE-ments and covered the opening with vellum to make a shaker element. I stamped the balloon string and bow from the Balloons stamp set. 


I filled the shaker opening with card stock confetti and I adhered a few extra pieces to the white panel for some extra color.  This punch works really well for creating shaker-sized confetti and you may already have it in your stash!


I adhered the shaker panel to an Aquamarine card base with foam tape and I stamped the "Happy Birthday" sentiment from Cake and Candles in black ink.


Well that's it for me today. Be sure to stop by the AEI{heart}U blog for even more inspiration from the design team and to link up your take on this week's challenge.  I can't wait to see what you create! 

Thanks for stopping by!
Katie


Saturday, July 5, 2014

Surface-Tag Blog Hop {Waffle Flower Crafts}

Hello, hello friends and Happy Saturday!  

Welcome to the Waffle Flower Crafts Surface-Tag Blog Hop!  Today the Waffle Flower Design Team is featuring the new Surface Tag stamp set and coordinating dies.  


Surface-Tag is no ordinary tag set, it is super versatile and the addition of the coordinating dies means there are even more possibilities.  In fact, I have three cards to share with you today using the following: 


First up, a simple card using the Surface-Tag stamp set only:


I stamped the stars in shades of blush, apricot, yellow and mint on a piece of white cardstock.    Next, I stamped the Happy Birthday sentiment from the set 10 times down a strip of white card stock.  I matted it with orange card stock and adhered it to the star panel.  I round the bottom corner of the stamped panel and adhered it to a mint card base featuring a strip of orange card stock at the bottom. 


I just love the whimsical look of the scattered stars. My daughter is turning 10 next week, and I think she would love to get this birthday card!  

Next up, a graphic and bold use of the ensemble using the Surface-Tag stamp set and the Starter Kit dies:


I made a card from white card stock and cut a card front from blue card stock.  Next, I die cut the tag from yellow, orange and pink card stock.  I stamped the stitched tag outline onto the die cuts taking card to not ink up the tag hole.  By selectively inking the tag stamp, I was able to get this super cute stitched rectangle look.  I adhered the rectangles at an angle and trimmed off the excess with a paper trimmer. 


I stamped Happy Birthday on the pink rectangle.  As a finishing touch, I stamped and heat embossed the stars from the set with gold embossing powder on blue card stock, punched them out with a circle punch, and adhered them to the card. 

Finally, my last card uses the Surface-Tag stamp set, Surface-Tag Die Starter Kit, and the Surface-Tag Die Scallop Add on.  I used these items to make a shaker birthday card. 


I started by die cutting the rectangle tag from a panel of patterned paper.  I die cut the scallop frame from white card stock and covered the opening with vellum.  I edged the die cut opening with foam tape and added some confetti made from the leftovers of a few edger punches.  You could also use a hole punch to create the tiny confetti.  I adhered another piece of card stock to contain the confetti and attached the shaker panel to a light gray card base. 


I made a banner by trimming a piece of pink card stock and notching the ends with a square punch. Some clear sequins add just a little more sparkle and shine. 

Nina was so sweet to convert my last two cards into sketches in case you would like to pin them for future use: 


You will want to be sure to check out all the fun ideas for this set that the Design Team is sharing today!

Katie Gehring– You’re Here!

Thanks for stopping by!
Katie

Monday, April 21, 2014

Sequin Shaker Blog Hop!

Hello everyone!

Waffle Flower Crafts is sponsoring the Sequin Shaker Blog Hop hosted by Pretty Pink Posh on April 26th!


Today, our Waffle Flower design team girls are sharing some sequin shaker cards to provide some ideas and help spread the word.

You should have arrived here from Joni Andaya's blog.  If not, please visit the Waffle Flower Crafts blog to pick up the entire hope order.

Given my relative inexperience with shaker cards, I decided to keep my creation it pretty simple. I cut a panel of aqua mist card stock and stamped it with the random star pattern from the Bowtiful stamp set.  Next, I cut a scalloped rectangle mat from white card stock with my Silhouette Portrait.  I centered the mat on the stamped panel and used a craft knife to cut a rectangle that is the same size as the center of the mat and adhered the mat around the opening.


I turned over the stamped panel and adhered a piece of acetate over the opening.  I lined the edges of the opening with foam tape and poured in some sequins.  I used the gorgeous Springtime Mix from Pretty Pink Posh. 


I stamped my sentiment (also from Bowtiful) on a scrap of white card stock that was a bit larger than my opening and adhered it to the foam tape to seal off the sequins.  Using a bit more foam tape, I attached the shaker panel to a Hibiscus Pink card stock base. 

Now for some details and a coupon!

Pretty Pink Posh Sequin Shaker Blog Hop
Link up your shaker creation on the Pretty Pink Posh Blog starting on Saturday, April 26, 2014 at 6 AM PST to Monday, April 28, 2014 at 11:55 PM PST. Everyone is welcome to play along and there will be loads of prizes from amazing sponsors. Waffle Flower Crafts is offering a Bowtiful Stamp Set and a Bowtiful Die Set as a prize!

If you need sequins, you can use coupon code BLOGHOP to save 15% on your order from Pretty Pink Posh from now through the hop day.


Your next stop on the hop is the fabulous Kim Kesti!

Good luck, everyone! Happy Crafting!
Katie