Showing posts with label birthday. Show all posts

Thursday, July 1, 2021

Slimline Sweet Day {Avery Elle}

Hello friends, 

Popping in today with a card featuring the absolutely adorable Sweet Day stamp set and the new Slimline Borders Elle-ments dies from Avery Elle. 


I stamped the images from the Sweet Day stamp set and colored them with Copic Markers. I die cut the images with the coordinating dies and set them aside while I built the slimline background. 


First, I cut a panel of watercolor card stock to 3.5" x 8.5 inches. I blended about one-third of the way down the panel with Distress Oxide ink in Tumbled Glass. I spattered the panel with water and white ink. Next, I cut the wavy border and grassy border from a piece of Neenah Solar White card stock and blended them with Black Soot to create pavement and Mowed Lawn and Twisted Citron to create grass. I adhered the borders to the panel of watercolor card stock. 

I adhered the stamp images to the panel, stamped the sentiment and adhered the completed panel to a slimline card base. 

Supplies: 

Thanks so much for stopping by! I hope your day is sweet!
Katie

Tuesday, June 8, 2021

Snappy Birthday Wishes {Avery Elle}

 Hello friends, 

I have  a card on the Avery Elle blog this week featuring the new Oh Snap stamp set, Hooray Elle-ments die and Easy Layers 1 Elle-ments die. 

I just adore this snappy crocodile. He's so festive and we have lots of celebrations planned for this summer. To make the card, I die cut a panel of Neenah Solar White card stock with the large stitched die from the Easy Layers 1 Elle-ments set. Next, I blended the die cut panel with two shades of Distress Oxide inks- Worn Lipstick and Dried Marigold. I spattered the panel with white ink and set it aside to dry. 


I stamped the crocodile with black ink, colored him with Copic Markers, and die cut the image using the coordinating Elle-ments die. I blended a small rectangle of Distress Heavystock with more Distress Oxide Inks- Worn Lipstick, Dried Marigold, Squeezed Lemonade, Twisted Citron and Salvaged Patina. I die cut the Hooray Elle-ments from the blended panel. 


I adhered the Hooray die cut at the bottom of the large blended panel and set the crocodile on top of the die cut. I pulled out the Speech Bubble stamp set and created a speech bubble to hold the "It's Your Birthday" sentiment. I added a few flat star sequins and attached the completed panel to an A2 card base. 


Thanks for stopping by!
Katie

Tuesday, May 11, 2021

Layered Cupcake {Avery Elle}

Hello friends,

I have a card to share today featuring Avery Elle's new Layered Cupcake clear stamps. I was immediately intrigued when I spied the previews for this set, but I was a little apprehensive too because layered stamps can be tricky. 

Once I figured out the layering line up (hint- align towards the bottom, not the top,) it was pure magic. seeing all the layers come together was like watching heat embossing for the very first time. Seriously! I fell in love fast!  


I got a little carried away making layered cupcakes and two of them found their way onto this card. I die cut the images using the coordinating Elle-ments dies and adhered them to a panel of card stock cut with the Wonky Stitches Elle-ments die. I added a couple clear flat sequins and a sentiment from the Sweet Day clear stamps. 


Supplies: 

Layed Cupcakes clear stamps

Layered Cupcakes Elle-ments

Sweet Day clear stamps

Wonky Stitches Elle-ments


Thanks for stopping by!

Katie

Tuesday, March 16, 2021

Looking for Rainbows?

Hello friends, 

Are you looking for rainbows? I am! Always! I am on the Avery Elle blog this week with a couple rainbow cards to share featuring the Happy Birthday Die and Look for Rainbows clear stamps. 

First, I made a shaker card with the Happy Birthday die. I blended Distress Ink on a panel of Distress Heavystock and die cut the Happy Birthday greeting. 


Next I made a shaker element with the Oval Burst Elle-ment die using lots of sparkly clear sequins! I attached the shaker to a notecard covered with a piece of patterned paper. I adhered the rainbow die  to the shaker and added a few clear flat sequins as a finishing touch. 


My next rainbow card uses the aptly named Look for Rainbows set. First I created the rainbow background with  a cloud edge stencil and Distress Inks. Next, I stamped the Bunny, puddle, and water drops and colored them with Copic Markers. 


I die cut the stamped images with the coordinating Elle-ments dies and arranged them on the background. I adhered the panel to a notecard and stamped the sentiment with black ink. 


Supplies

I hope these rainbow cards brightened your day! Thanks for stopping by!

Katie

Thursday, March 11, 2021

Peek-a-Boo Birthday Tag Toppers {Avery Elle}

 Hello friends, 

Popping in to share a card featuring Avery Elle's Peek-A-Boo Birthday Tag Toppers dies. These cute critters are the perfect size for tags, but they can be used for cards too!


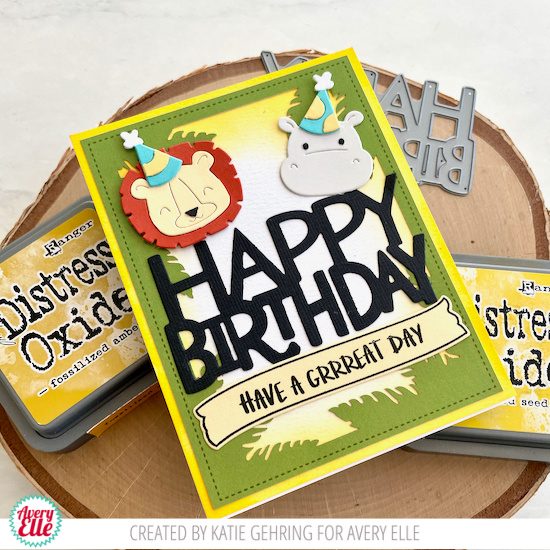
For my card, I used the lion and hippo to make a wild birthday card. I die cut the animals and hats from card stock and assembled the images. Next I die cut the Happy Birthday die from black card stock. 


To pull all these elements together, I used the banner and one of the sentiments from the Peek-A-Boo Jungle clear stamps. I blended a panel of watercolor card stock with a couple shades of Distress Oxide Ink and added a die cut frame from the Fairy Ephemera pack. You can also use the Leafy Frame Elle-ments die to create your own! 

Supplies

Thanks for stopping by! 

Katie

Tuesday, January 12, 2021

Frenchie {Avery Elle}

 Hello friends, 

Poppping in today to share a card featuring Avery Elle's darling Frenchie stamp set and coordinating Elle-ments dies.  I love that this set is so versatile. It's perfect for Valentine's Day and for celebrating birthdays too! 


I stamped the images onto white card stock and colored them in with Copic markers. I used E50, E51, E53, E55 and E57 for the pups and R00, R01, R02, R05 and YR00, YR01, YR04 for most of the accessories. The pups' bandanas were colored with B000, B00, B01, and B02.


I adhered the colored images to a card panel blended with Distress Oxide ink in one of my favorite shades, Dried Marigold, spattered with some white ink. I stamped the sentiment with Versamark ink onto black cardstock and heat embossed it using white embossing powder. 

Supplies:

Thanks so much for stopping by! 
Katie

Tuesday, July 21, 2020

Fuzzy Puppy Card {Avery Elle}

Hello friends,

Puppies are the best. They're so fuzzy and sweet. All of that darling puppy goodness is captured perfectly in Avery Elle's new Dog-Gone clear stamp set.

Sometimes, colored images can look a bit flat, but there's a very simple technique that you can use to add a little texture and dimension to stamped images colored with Copic markers.

First, stamp and color your images as usual.  If there are any parts of the image that you don't want to texturize, leave that area uncolored. (See the dog collar and tag in the bottom left image below. )


Next, grab a terry cloth towel and Copic Colorless Blending Solution and add a few drops a small area of the towel. 


Press the towel on the colored images and the blending solution will lift the ink leaving behind the texture of the towel.


Super fun and simple too! Now here are all these fuzzy cuties on a card.


I used a cloud stencil and the Dotted Borders Elle-ments die to create a little background for the puppy party. I added some of the accessories and smaller images from the stamp set to round out the scene.  


Supplies: 

I hope you'll give this technique a shot next time you'd like to add some faux fur texture to your colored images.

Thanks for stopping by!
Katie

Tuesday, June 23, 2020

Stay Cool {Avery Elle}

Hello friends

I am on the Avery Elle blog today with a card featuring a couple of cool characters from the Stay Cool Clear Stamps set. This set is fantastic for all the cool cats, bunnies, dogs and bears in your life and the sentiments are perfect for so many occasions.


I stamped the bear and dog images onto white card stock and colored them with Copic Markers. I die cut the images along with the "Stay Cool" speech bubble. I needed a cool background befitting of these characters, so I layered a piece of ombre paper from The Spring Collection Paper Pad behind a die-cut background created with the Waves Elle-ments die.


I adhered the images to the background. I stamped and heat embossed the sentiment onto a tag created with the Party Tags Elle-ments. I added some of the stars from the set as a finishing touch before adhering the completed panel to an A2 notecard.

Supplies

Thanks for stopping by, party animals! I hope you have a cool week! 

Katie

Tuesday, April 28, 2020

Dino-mite Day {Avery Elle}

Hello friends,

Stopping in today to share a card featuring the adorable and fierce dinosaurs from Avery Elle's Rawr Clear Stamp set.

These dino pals are ready to celebrate, so I set the scene using Avery Elle's Leafy Frame Elle-ments die. I die cut the frame twice, once from green card stock and the second time from patterned paper. I inverted the green card stock frame before glueing the layers together for some added interest and dimension.


I stamped and colored the dinosaurs and party hats with Copic Markers and die cut them with the coordinating Elle-ments dies. I adhered the die cut frame and dinos to a panel of watercolor card stock blended with a bit of Distress Oxide ink around the edges.


For the sentiment, I borrowed the frame from the Peek-A-Boo Jungle stamp set. I stamped the banner and sentiment on black card stock with Versamark ink before heat embossing with white embossing
powder. I die cut the banner and added it to the card.

Supplies

Thanks so much for stopping by! I hope you have a dino-mite day! 
Katie

Sunday, April 26, 2020

Peek-A-Boo Fair Double Feature {Avery Elle}

Hi friends,

Katie here with a Double Feature video for Avery Elle! Two cards using the Peek-A-Boo Fair stamp set.  This set makes an adorable backdrop for the Peek-A-Boo pals. I just couldn't decide between bumper cars and ferris wheel, so I bought the extra ride ticket and made two cards!


I really love the "I miss bumping into you" sentiment paired with the bumper car images. I know many of us miss bumping into our special friends right now.


The dragon from the Peek-A-Boo Scary Pals joined the unicorn for a fun day at the fair. The dragon looks so festive in a party hat while the unicorn snacks on cotton candy.


I hope you will take a peek at my video to see how the cards came together!

Monday, March 30, 2020

Sweet Swines {Avery Elle}

Hello Avery Elle friends!

Stopping by today to share a festive card featuring Avery Elle's Sweet Swines clear stamps.

This little piggy is ready for a party, so I set a celebratory scene using the Ray Elle-ments die. I blended some yellow ink and added some ink spatters before cutting the white card stock with the Ray die. I also created a little shaker window by sandwiching some flat sequins and glitter between two panels of clear acetate. I adhered the shaker element behind the circle opening.


I stamped the pig and party accessories, colored them with Copic Markers and colored pencils and die cut the images using the coordinating Sweet Swines Elle-ments die. For color inspiration I looked no further than Avery Elle's red and aqua logo. Along with the yellow background, a color scheme featuring primary colors is always a winner.


I adhered the stamped images to the Ray background to set the party scene and tucked a sentiment from the Speech Bubble clear stamps behind the party pig's ear. As a finishing touch, I added some of the small stars included in the Sweet Swines set.

Supplies:


Thanks for stopping by! I hope you week is off to a great start!
Katie

Monday, March 16, 2020

Happy Birthday {Avery Elle}

Hello friends,

Hot Dog! It's Hot Dog inspiration week on the Avery Elle blog. I have a card to share with you today featuring the pups from this adorable stamp set along with some of the patterns from The Spring Collection paper pad.

I wanted to feature as many of the dogs from the Hot Dog set as I could on my card, so I set a scene using the Party Tags Elle-ments dies. I used the second largest die to cut tags from some of the fun patterned paper in The Spring Collection paper pad. After die-cutting the tags, I trimmed off the top of each tag creating a straight edge at the end to align with the edges of the card. 

I stamped the dog, bone and balloon images onto white card stock and colored the images with Copic markers before die cutting the images with the coordinating Hot Dog Elle-ments dies.


I place the main images onto each of the tags that I arranged on a white A-2 card base. I added polka dots with a white gel pen to one of the party hats and stamped the sentiment onto the purple tag with black ink.  I chose to keep my card flat for easy mailing, but you could totally add some sequins or enamel dots to really amp up the party fun!

Supplies:

Thanks so much for stopping by! 
I hope you have a wonderful day!
Katie

Tuesday, February 11, 2020

Peek-A-Boo Jungle {Avery Elle}

Hello lovelies,

Katie here with a little Peek-A-Boo Pals: Jungle inspiration to share with you today from Avery Elle's latest release. I love all the Peek-A-Boo Pals and I am just WILD about this latest addition.


For my card, I blended some Distress Ink around the edges of a panel of water color card stock and spattered it with an orange spray stain. I stamped, colored and die cut all the pals along with the banner and sentiment.

To set the scene, I die cut the Leafy Frames Elle-ments die from green card stock and tucked all the pals and the banner among the leafy fronds. I arranged the paws and hooves so that the Pals really look like they're playing Peek-A-Boo in the jungle setting.

Supplies

Thanks for stopping by! 
Katie

Thursday, January 23, 2020

A Wheelie Great Birthday {Avery Elle}

Hello!

Katie here with a little Wheelie Great inspiration to share with you today. The images in Avery Elle's Wheelie Great are so sweet. I love all the accessories and different elements that can be added to the bicycling bunny.


I stamped the bunny, mouse, flowers and cake image onto white card stock and colored the images with Copic markers. I die cut the images with the coordinating Wheelie Great Elle-ments dies. I also die cut a panel of white card stock with the Quilted Frame Elle-ments die. I blended the center oval with Distress Ink before adhering the images to the oval and attaching all the die cuts to an A-2 notecard.


I stamped the sentiment onto one of the narrow tags from the Party Tag Elle-ments die set. I adhered the tag to the card and added a light yellow button over the hole in the tag as a finishing touch. 

Supplies

Thanks for stopping by!
Katie

Thursday, November 21, 2019

Avery Elle Winter 2019 Blog Hop!


Hello friends!

I am very excited to be participating in a blog hop today in honor of Avery Elle's Winter 2019 Release! 

I have a card to share featuring the new Hooray Clear Stamps. I love the size and the font used in this set! It really makes a bold impact! 


I stamped a confetti background on a panel of white card stock using all the little bits and accents included in the Hooray stamp set. Next I stamped the "hooray" sentiment three times using black Versafine ink. I heat embossed the sentiment using Clear Embossing powder.  


To add a little more detail, I die cut the dotted circle that can be found in the Dotted Borders Elle-ments die set and adhered a few flat disc sequins. I trimmed the edged of the white card stock panel just slightly and attached it to a teal A2 size note card. 

Supplies*:


The rest of the new release is available in the Avery Elle store right now! To celebrate the Winter 2019 Release Blog Hop, Avery Elle is giving away a stamp set of their choice to 3 winners.  To enter to win just comment on this post and be sue to visit the other designer's blogs participating in today's hop. You can read all the detail on the give-away on the Avery Elle blog including details on additional ways to enter to win!  


The winner will be announced on the Avery Elle Blog on Monday, December 2nd. Good luck, happy hopping and thanks for stopping by!

Katie  

*affiliate links used at no cost to you

Friday, October 11, 2019

Introducing the Create Magic Card Kit {Avery Elle}


Hello friends, 

I am so excited because today I get to introduce a new product to you that is available for purchase now!  Our Limited Edition Exclusive Create Magic Card Kit costs $27 and is only available on the Avery Elle website while supplies last.  This card kit is full of inspiration and exclusive supplies to create adorable cards, tags and more.    If you are interested in this kit I suggest you pick it up quickly as they are sure to sell out.  You can find this kit here.

The kit includes the following items:

1-  Exclusive 4 x 6"  stamp  set - not available anywhere else
1 - .5 oz Coarse Glitter
1 - Strawberry Hemp Twine Roll
4 - 4.25" x 5.5" sheets of acetate
1 - Create Magic exclusive Vinyl Zippered Mesh bag - - not available anywhere else
12 - Create Magic exclusive 6" x 6" Sheets of patterned paper - - not available anywhere else
1 - Exclusive Fairy Ephemera Pack - - not available anywhere else

* There is an add-on of a coordinating die to the Create Magic Card Kit that is sold separately here.

To see more of this kit be sure to check out the following video.


I had so much fun putting together samples using this kit. I was amazed how quickly I was able to put together really cute cards using the stamps and coordinating elements. The patterned paper and die cut ephemera made designing a breeze!


You can find a downloadable pdf file full of inspiration from our Design Team for this kit here.

Well, that's all for me today. 
I hope you will check out this kit and invite a little magic into your life! 

Thanks for stopping by!
Katie

Wednesday, August 7, 2019

Swell Birthday Card {Avery Elle}

Hello friends,

I am on the Avery Elle blog today with a card featuring the Swell stamp set.  The Swell stamp set set works so well on it's own or as a watery background with other images. Here I paired it with the CelebRAYtion stamp set to create a birthday card.


I stamped the Swell image with Veramark ink onto a panel of water color card stock and heat embossed it with Avery Elle's Rose Gold embossing powder. I used a blending brush to add Distress Oxide inks in Squeezed Lemonade, Dried Marigold and Tattered Rose around the edges of the card.  I stamped the sentiment from the Swell stamp sent in the center of the background image and heat embossed it with Rose Gold embossing powder.


I stamped the rays, sea grass, party hats, and cupcake images onto white card stock and colored them with Copic markers. I die cut the images with the CelebRAYtion coordinating Elle-ments dies.  I arranged the images onto the blended panel and adhered them with Avery Elle's liquid adhesive.  I attached the finished panel onto an A2 notecard.

Supplies:

That's all for me today! 
It was so 'Swell' of you to stop by and spend part of your day with me! 
Katie

Monday, June 24, 2019

Two A-llama Birthday Fun! {Avery Elle}

Hi everyone,

Katie here with a card to share with you featuring the super fun Peek-A-Boo Car Clear Stamps.  Our Peek-A-Boo friends are all grown up and driving, but they're aren't the only furry pals who are itching to get behind the wheel...


The flashing alarm, or should I say a-llama, light that you can add to the top of the car inspired me to pull out a set released earlier this year, and I put a couple of the Llamas from the Llamazing clear stamp set behind the wheel for a little birthday fun! I stamped, colored and die cut the car, alarm, cactus, gift and llama images. I placed the llamas in the car window and trimmed off any excess of the stamped images. 


I positioned the car and the other images on a panel blended with Distress Oxide inks and anchored it with some die cuts from the Cityscape Elle-ments die (which is on SALE now) and the Dotted Frames Elle-ments set. I stamped the sentiment from the Llamazing stamp set onto black card stock and heat embossed it with white embossing powder. The Reverse Pinked Rectangles Elle-ments die (also on SALE) frames the images and die cuts and some clear sequins add a sparkly finishing touch.

Supplies:

Thanks for stopping by!  
Katie

Tuesday, April 30, 2019

Hip Hip Hooray for the So Kind stamp set {Avery Elle}

Hello friends,

I am on the Avery Elle blog today with a card to share with you today featuring a sentiment from Avery Elle's So Kind stamp set. I love the fresh and fun mix of lettering on this sentiment set; it really compliments so many different images and occasions. For my card, I paired the "Hip Hip Hooray" sentiment with the original Peek-A-Boo Pals stamp set.


First, I blended a panel of water color card stock with two shades of Distress Oxide inks (Peacock Feathers and Dried Marigold). I left some white space between the two colors so they wouldn't blend together to make a muddy green. I spattered the blended panel with water and white paint. Once the panel was dry, I stamped the sentiment in black ink.


I stamped the Peek-A-Boo pals onto white card stock and colored them with Copic makers.  I used the coordinating dies to cut out the Pals and a few of the stars included in the stamp set. I adhered the largest Wonky Scalloped rectangle at an angle onto the water color panel and tucked the Pals and their paws towards the bottom of the frame.  As a finishing touch, I added a few clear sequins before adhering the completed panel to a white notecard.

Supplies

I hope this card makes you want to celebrate and shout "Hip Hip Hooray" for the So Kind stamp set! 

Thanks so much for stopping by!
Katie

Thursday, February 7, 2019

Avery Elle Spring 2019 Blog Hop!


Hello friends! 

I am so excited to be joining in all the fun with Avery Elle's Spring 2019 new product release and Blog Hop!  You should have arrived here from Melania's blog. 

I have a fun card to share with you today using the new Journey stamp set and coordinating Elle-ments die.  The Journey stamp set features this adorable car with trailing balloons, tree and sentiments perfect for so many occasions.  From birthdays to weddings to graduations and other accomplishments, Journey's got you covered! 


To make my card, I blended a watercolor panel with a bit of Distress Oxide ink in Tumbled Glass and Twisted Citron.  I stamped some of the stars from the set onto the grass for a little more interest.  Next, I added some die cuts using the Cityscapes Elle-ments set and the Wonky Scalloped Frame Elle-ments. 


I stamped the images with Avery Elle's New Moon dye ink and colored them with Copic markers. I adhered the images to the panel and stamped the "Celebrate" sentiment onto the sun shape. Such a fun stamp set and perfect for teens!  I'm going to tuck this one away for my daughter's 16th birthday, which is coming faster than I care to admit.  :)

Supplies
New Moon Dye Ink Pad

All products are available for purchase in the Avery Elle store right now.  You can check them all out here. 

In celebration of the new release, Avery Elle is introducing a new special- orders over $75- before shipping and tax- will receive a free small zippered vinyl mesh bag!  Avery Elle is also giving away a $25 Gift Certificate to one random winner.  To enter to win just comment on this post and on the posts of the designers participating in today's hop.  There is no purchase necessary and you must be 18 years of age or older to enter.  This giveaway is void where prohibited.  You have until midnight Sunday, February 10 to enter.  The winner will be announced on the Avery Elle Blog on Monday, February 11.  

Your next stop is Amy Kolling!
Thanks for stopping by! 
Have a great day and good luck!
Katie