Showing posts with label Stamp Out Chaos. Show all posts

Wednesday, January 7, 2015

Stamp Out Chaos: The Reveal

Good morning friends,

It's been WAY too long, but today, Lindsay and I wanted to start wrapping up our Stamp Out Chaos series by sharing with you some pictures of our crafty space.


If you want to catch up on my other organizational hijinks and shennanigans including some really scary before photos, click here. 

One of the pieces of furniture that has worked really well for me is the Ikea Expedit.  I think it goes by another name now, but I started with a 4 x 4 unit and added a 4 x 2 unit and placed it on top taking the storage up to the ceiling and I love it.  The top cubbies hold my scrapbook albums, some project life supplies and the baskets contain extra card stock as well as memorabilia and items for particular album projects. 

The Expedit also holds my stamp collection in Avery Elle storage envelopes and Fridge Binz.  I use divided plastic boxes to contain wood veneers, metal embellishments and a floral storage box to corral stickers and sticker letters.  


I also added drawers to the bottom two rows of Expedit cubbies.  These drawers hold supplies like stencils, paint, specialty tools (punch boards), felt, fabric, bling, buttons, envelopes, bags, and tags. 

To the left of the Expedit is a large bulletin board.  I painted the board white before stenciling a trellis pattern with cheerful yellow paint.  


Moving into my work area, I have the aqua Raskog cart adjacent to my desk.  I used an Antonius insert to organize my working stamps and supplies- including 6 x 6 paper pads, adhesive and my stamp press.


The two remaining shelves hold project life cards and supplies. 


Tucked under my desk is my Elfa File Cart- this holds most of my "good" card stock and has 3 baskets below perfect for holding paper scraps. 


I found these bright yellow desk accessories at TJ Maxx.  I am using them to hold mini ink cubes, post it notes and other bits and bobs for crafting. 


The Pro Ink Organizer from Organize More is hung on the wall above the corner of my L-shaped desk. Sophie gave me the "World's Best Mom" foam sign last year for Christmas and was insistent that it be displayed in my room.  


I have a dedicated space on my desk for my computer and Silhouette portrait.  Sometimes, the crafty mess migrates to this area, but I do try to keep this area tidy.  

Above the desk, my hubby also installed a shelf that I use to hold ribbons, patterned paper scraps and project life embellishments.  I picked up a metal rod at the hardware store and used some clip-it-up clips to hold some packaged embellishments.  With embellishments in particular, I seem to need to see them in order to remember to use them.  


This is the Making Memories embellishment center and it's super handy for keeping items in close reach, but off my desk.  Currently, it's holding the Mini Distress Ink Cubes and Storage Tins that I received for Christmas as well as stamp storage pockets.  

Below the center is a Bygel rail and 4 containers.  I use this to hold pens and other tools and supplies that should be in close reach.  I recently added a dry-erase calendar to my space to help me track crafty assignments and blog posts and with some techniques tending towards the messy side these days, I thought a paper towel holder might come in handy.  


I have a couple accent shelves on the other side of the window and use them to hold twine, scissors, markers and a few special projects. 


This area is directly across the room from my desk.  This is where I house my paper trimmer, die cut machine and giant wall of die storage.  The cubbies below (more of the Expedit series) hold photos, books, 12 x 12 paper and 8 x 8 paper pads


These two wall units were lucky finds.  One of my girlfriends used to sell Mary Kay and her Father in Law built her this unit to hold her eyeshadow refills.  When she stopped selling, she offered it to me.  It works perfect for organizing embossing powder and displaying a few wood-mount stamps. 

Below is a wooden cassette holder that I use to mostly organize my pigment inks.  I found this on Craigslist for $10.00.  Some day I may get around to painting it white to match the rest of the room.  


Next week, I am planning a post that will contain links to the resources I used when putting together the room as well as some lessons learned along the way.  Until then, please let me know what questions you have or if there is anything that you would like to see in more detail, and I will get back to you!  

Don't forget to check out Lindsay's new space too!  It's pretty fab! 

Thanks so much for stopping by! 
Katie

Thursday, July 31, 2014

A Consumer Relapse {Stamp Out Chaos}

Hello friends,

So, it's been a moon or two since Lindsay and I did a Stamp Out Chaos post.  No we didn't abandon the effort.  We have been working on finishing up some bigger projects in our spaces, and it's summer- you know where the call of spending a lovely day outside with the family is more powerful than a siren's song.

I thought I would pop in today with a post to share the current state of affairs in the crafty space.   A few months ago, I had the epiphany that one of my biggest challenges to organization was that I simply owned too much stuff.  It was suffocating me and seriously impeded my creative efforts.  So I purged.  Boxes upon boxes of crafty supplies left my room and were donated to the school, to daycare and some were even sold.

This made all the difference in my space.  Sure there was more work to be done and of course more could (and will) eventually go, but simply freeing up some valuable real estate from items that were in excess, no longer fit my habits, or my style was an absolute game changer.  Rational minimalism was the way to go.


But then something happened...

Looking back, it started in June with the Father's Day weekend sales, continued through July 4th sales, a couple "must-have" new releases from favorite stamp companies, and an online shop's moving sale (40% off people!).  After not making many crafty purchases over the past several months, I had a full-on consumer relapse.  I engaged in the online equivalent of "shopping until I dropped." The padded envelopes started arriving at the house and stuff started creeping it's way back into my little crafty space.

In one way, the delayed gratification and waiting for these sales allowed me to acquire many sets that had been on my wish list, but as a result of all my new acquisitions, the craft room equilibrium shifted and my space was teetering on the bring of chaos once more.

What I came to realize is that as much as my initial goal when I started this journey was to organize my room "once and for all," that's really not how it works.  Do we unload the dishes once and for all?  Vacuum once and for all?  Nope, these are daily/weekly maintenance tasks we (begrudgingly at times) perform to keep our homes running smoothly.  It's the same with creative spaces. It's never done. Maintenance will be necessary to keep the space functioning at an optimal level.

So what's to be done? Two (really three) things...  

The Great Purge- Part IX
As new stamps have arrived, I took an opportunity to go through my stash of supplies and pull out those that have not and are not being used.  I am in the process of listing them for sale online where I hope that they will be able to find new and happy homes.

A Month of Neglect
As I mentioned in an earlier post, there is nothing inherently wrong about crafty purchases.  New products are inspiring and they help fuel this creative industry that we all love.  The problem happens when the items are purchased and not used.  I have many, many sets that I purchased and still love (in other words, I am not ready to let them go), but I need to put them to use.  So to address the horde of unused stamps and supplies in my possession, I am declaring August 2014 as a Month of Neglect.  I will be devoting most of my blog posts in August to stamp sets that have seen little to no inky action.


It is my hope to post daily or nearly daily to share projects created with my (previously) unused stash of stamps.  I hope that you will continue to pop in to see what I have been up to!  The fun starts tomorrow, August 1.

Learning  
I also signed up for an organization class called Workspace at Studio Calico.


The class is being taught by Marcy Penner and starts August 4.  Enrollment ends tonight at 11:59 PM EDT.  I hope that between letting go of more excess, using what I have and seeing some new ideas through the class, I can continue my mission to Stamp Out Chaos.  

Thanks for stopping by!
Katie

Wednesday, June 18, 2014

Stamp Out Chaos- Ribbon, Twine and Washi


Please scroll down to the end of the post for my entry into the Moxie Fab World Photo Pocket Journaling Card challenge!

Hello friends,

It's time for another Stamp Out Chaos.  This week, Lindsay and I talking about storage and organization of twine, ribbon and washi tape.  If you missed a previous post in this series, you can catch up here.

First up- twine.  Previously I was keeping all my twine in a penny candy jar, but I found that the twine was getting rather tangled and matted, so I took some time one evening to unravel the twine and wrap it around wooden spools that I had on hand from another project.  Once that was complete, I stacked the spools of twine on a wooden thread holder.  I have another large spool of twine next to the thread holder and a small wooden crate holds some additional jute and rick-rack ribbon.


For washi tape, I decided to keep it simple and keep my rolls of tape in a three tier holder from Land of Nod.  It looks like Nod no longer carries this item, but I have seen similar containers at TJ Maxx and Homegoods.


Ribbon- Over the years I managed to horde, I mean collect, gobs and gobs of ribbon.  Since this is not an embellishment that I use frequently, a major purge was in order.  I sorted through all my ribbon and gave a large bag of assorted ribbons and some other crafty goodies to the Elementary School.  


Now all my most loved ribbons fit neatly in a jar. 


I searched Pinterest and found a few other awesome organizing ideas that I wanted to share:


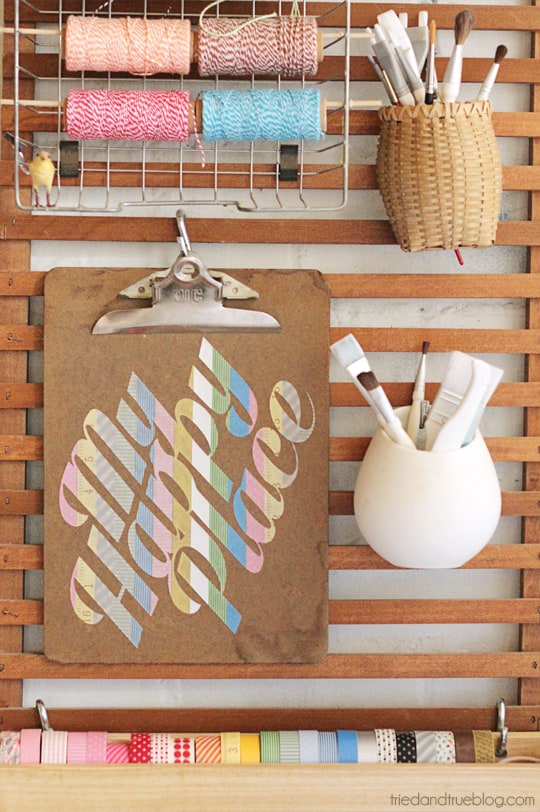
This amazing twine and washi storage/display is from the Tried and True Blog. 


Jennifer Jones from I Heart Organizing (one of my favorite blogs) created this DIY washi tape organizer from an acrylic drawer organizer, some tension rods and deconstructed cellophane wrap containers.  Brilliant!

Now for a little crafty project using twine and washi tape.


I stamped a panel of pink cardstock with the woodgrain pattern from Avery Elle's Woodgrain and More set and adhered it to a white cardstock base.  Next, I stamped the "You're a Gem" sentiment from the Many Thanks set on a pocket page journaling card.  I pierced holes in the gem image and stitched the shape with black twine.  


 I adhered the journaling card to the pink panel and added a bit of washi tape at the top and bottom of the card.  A few silver sequins add just a touch of shine.

And since I totally used a photo pocket journaling, I am linking this bad boy up to the Photo Pocket Journaling Card challenge at Moxie Fab World.  You have until June 22, 2014 to get in on the fun!!!

Well that's all for me today; be sure to stop by Lindsay's blog to see what clever solutions she has in place for her washi, twine and ribbon.  Thanks for stopping by!

Katie


Wednesday, June 4, 2014

Stamp Out Chaos- tools and a video!

Hello!

I am back today with another installment of Stamp Out Chaos.  Henceforth to be known as the #neverendingcraftroomcleanup.  If you'd like to catch up on our progress to date, you can check out all Stamp Out Chaos posts here.


This week Lindsay and I are talking tool storage, AND I have something a bit different for you today- a video. What?! Yep!  I made my very first crafty video and I didn't die- no pun intended.  (While no craft supplies were harmed in the making of this video, I was slightly mortified at all the "umm's" and "actually's" that snuck into my rambling... seriously, it's bad, but could make for a fun drinking game someday.)  So without further ado, watch and enjoy!


Some of the sources I mentioned in the video:
  • Magnetic vent covers- I picked these up at Home Depot for around $5.00 for a set of 3.  The measure 8"x15".  I have both nailed them to the wall AND cut them and put them in vinyl pockets to store nesting and coordinating dies.
  • Simon Says Stamp- Clear Storage Pockets- These pockets measure 5"x5" and I use them to store lots of my nesting dies. 
  • Adhesive pouch from VinylEnvelope.com- I adhere these pockets to cardboard and use them to hold dies that are larger than 5" x 5" 
And before I go, a card I made with my very favorite type of tool... dies!

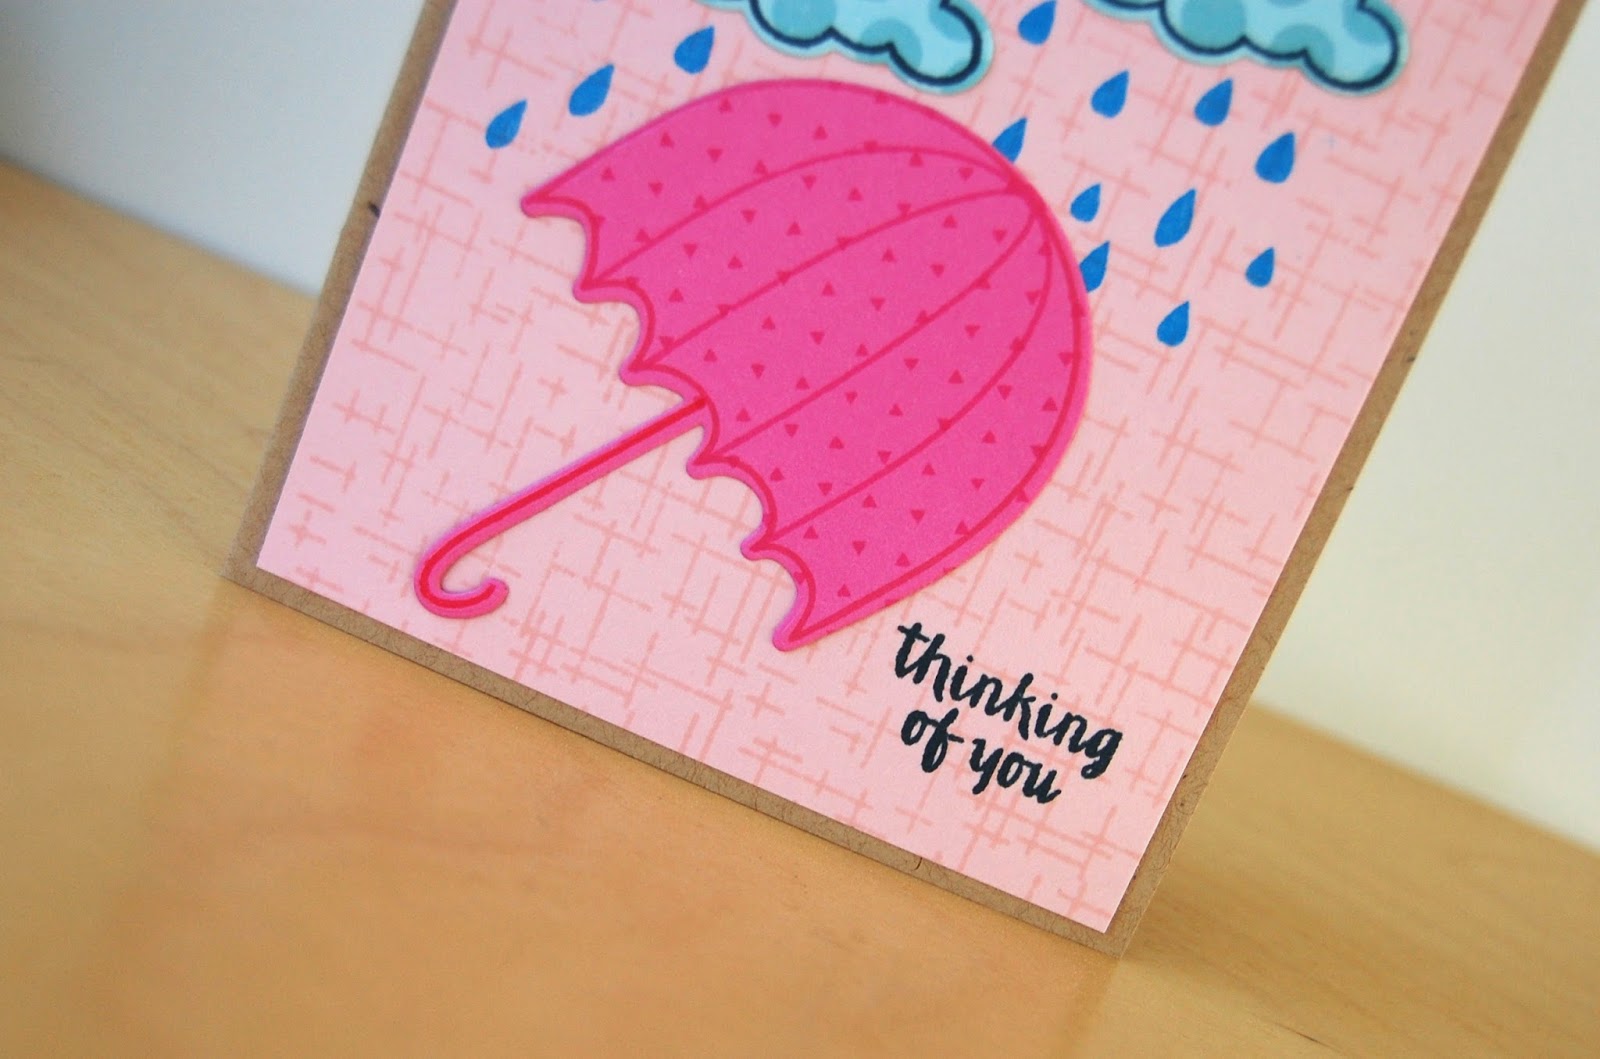
For this card, I inked up a few Avery Elle sets including Weather It and dies, Texture Tiles: Be Cool and Woodgrain and More.

First, I stamped the thatched background from Woodgrain and More in Pink on some light pink cardstock.  Next, I die cut the umbrella and clouds from Weather It from a bright pink and light blue cardstock. I stamped the outlines, then added some more interest by stamping polka dots on the clouds and tiny triangles on the umbrella. 

I adhered the clouds to the card and stamped the raindrops in blue pigment ink- I love how bright and vibrant this ink looks!  It's Bahama Blue by Memento Luxe. Finally, I stamped the sentiment in navy ink.  


Be sure to stop by Lindsay's blog to check out how she stores her tools-I LOVE that she found a way to get them off her desk... I am going to have to borrow that idea! 

Well, that's all for me- thanks for stopping by!
Katie
Monday, May 26, 2014

Stamping Lightly- Letting In and Letting Go


Hello friends,

Friday evening I took a deep breath and started to implement the changes I am planning for this blog, my little corner of the internet.  I updated the design to something that is both simple and graphic, and I changed the name of the blog from "Our Charmed Life" to "Stamping Lightly."  Due to the blog template settings, technically, the blog name is showing up as "stamping" and the tagline is "lightly." I am not going to worry about it. Less is more, right?

So what does "stamping lightly" actually mean anyway? As I shared last week in my Stamp Out Chaos post, I have been doing some reading on the minimalist movement and one of the authors spoke about traveling lightly.  Beyond the benefit of not having to check your luggage on vacation, light travel speaks to life being a journey which can be enjoyed better and more fully if we only carry with us the barest of essentials.


After 13 years of paper crafting, I have managed to acquire a lot of stuff. As I sit in a 10 x 11 room that my girls refer to as the "scrapbook store," I sometimes wonder how I got here.  When I first started scrapbooking, all of my supplies fit in a single shoulder tote.  And you know what, I never had more fun doing a hobby.  I was hooked. It was simple and I didn't agonize over every decision.  Now I don't necessarily want to return to the land of colorful cardstock triangles in opposite corners of my pages or trimming all my photos into ovals, but sometimes I long to recapture that simpler time.

For me, it's not fun to be overwhelmed by things or having more supplies than working space. "Stamping Lightly" is about this journey to return to a voluntary level of simplicity and keeping only things that will help my creativity soar and not weigh me down.

I think as a community, paper crafters love to organize and reorganize our stashes of crafty supplies. They are pretty and oh, so inspiring, but I have come to realize that there is more joy to be found in owning less than in organizing more.  I have a lot to say on this topic, so I will break it into two parts- Letting In and Letting Go.


Letting go (Purging)
A few weeks ago, I painted my craft space and in order for me to access the walls, a lot of stuff had to come out and found a temporary home in our bedroom (Jason is the most patient hubby in the world!) and the hallway (yep, just like hoarders... #winning).  The act of emptying the space (mostly) was an absolute game changer for me and my space. What I found was that once the room was emptied and quieted, I was reluctant to let stuff back in.


Some items were 'no brainers' to allow back in, like my die cut machine, computer and photos, but other items were put through a discernment process where I asked the item and myself the following questions: 
  • What purpose do you serve?
  • Have I used you?
  • Do I have plans to use you?
  • Do I have some place to put you?  This is important- without a home- stuff, even useful stuff can become clutter. 
  • Are you still "me?"  Styles and preferences change over time.  If there is a supply that is no longer you- think about letting it go or at least pairing it down.  I did this with my ribbon stash recently and will share pictures in an upcoming post.  
  • Do I have anything like you?  One of the minimalist principals that I am trying to adopt in my life is embracing the power of 1.  For example, do I really need 3 pairs of Crocs or will 1 pair suffice? Same could go for crafty supplies, if two stamp sets are similar or serve a similar purpose- what is the need for keeping both?   For me, baby and wedding sets come to mind.  If you can't find a unique purpose for an item, maybe it's time to let it go.

Where does it go?
Once you decide to let items go, the question become- what do I do with all of it?  There are two options here- Sell or Give away. To help you decide, I love this decision chart from The Handmade Home. 


I think you can also use Crafty Message Boards/Facebook resale groups in addition to Craigslist/Ebay. I also factor in the ease and price of shipping in making my decisions.   Stamps and dies- easy to ship- I am more likely to sell. Paper and bulky embellishments- not so much- these wind up in the donate pile. 

As I am evaluating my stash, I have a box of items that I plan to list for sale on Facebook and Message Boards and an even bigger box of items to donate.  I am giving my donations to Sophie's Kindergarten teacher who in turn shares with the elementary school staff.  If you don't have kids in school, you can always call a local school to inquire about donating craft supplies.  Preschools, daycares, and even children's hospitals and nursing homes are also great places to share your crafty stash.  

I am also setting a time limit on my sale items.  If they don't sell after a certain amount of time, I will give them away.  Before Archivers closed this February, I attended the store's last crop and brought with me a huge bag of craft supplies and stamp sets in need of a new home.  I placed the items on the back counter and let my fellow crafters know that these items were up for grabs.  Not a single item was left and it felt great to make others happy by sharing my excess. 

Now that we have talked about letting our items go, how do we handle new items? 

Letting in
Let's face it, part of the fun of our creative hobby is purchasing the latest and greatest stamps, dies, paper, and embellishments.  New purchases can jump-start creativity and allow you to experiment with new trends and techniques.  Brilliant designers and manufacturers seemingly create a new round of must-haves on a monthly basis.

Consumerism is not the issue; all of our purchases keep our little paper crafting community growing and thriving. The problem is when it becomes excessive.  Excessive is when is extends past what will be useful (used) and necessary (needed). Sure there is the initial joy of opening a package of happy mail or getting a delivery from UPS, but that happiness is fleeting and can be replaced by guilt and frustration.  Guilt at having spent money on something that is not being used and frustration at having even more to sift through while trying to create.

I have come to realize that I don't have enough time to use and love every stamp set, paper and die that I fancy.  As a result, I need to pay close attention to what I chose to purchase and invite into my space.  I need to be good gatekeeper. Before making a purchase, I am asking myself these questions.

  • Do I have stamps that have not seen action?  I have started keeping my new purchases in a basket on my workspace as reminder to use them before I incorporate them into my stamp organization system.  Currently this basket is full and it's a good visual reminder that I still have sets that are unused.  Unused supplies are like wasted money.  While you may be able to sell them and get back some of the money, it's never the full amount you paid.  Before acquiring more, I need to use what I have.   
  • Do I have anything like this?  I spent some time this weekend organizing my dies and came to realize that I have 15 "hello" dies.  Granted, many of these dies came as part of a larger sets, but for someone who doesn't really send THAT many "hello" cards, it seems a bit excessive.  Now a set of 15 "sorry I flaked out and bought a card for your major life event" or "happy belated birthday" dies, I could justify that.  :) 
  • Can I think of 3 unique ways to use this product? Versatile products are going to get the most usage in a streamlined environment, so before purchasing try to think about three designs for the item.  They don't have to be designs that you dreamed up- casing another crafter or a design team  member is perfectly acceptable, but the designs have to be do-able for you. 
  • Is this a wise investment?  Let's talk about a $15.00 stamp set.  With the going price of greeting cards at the store running around $2.99,  are you willing to make 5 or more cards with this set to recoup the price of the set?  
  • Will I still love you tomorrow?  More than once, I have purchase supplies for no other reason that everyone else was really excited about them.  In these situations, I need to step away from the computer (that's were the enablers live-LOL) and examine my reasons for wanting something.  Is this a long term interest or a passing fancy?  One guideline I am trying to adopt is that when feasible, I am trying to wait 30 days before clicking purchase so that I can be more certain that my acquisitions will suit me.  More often than not, the initial "want" has waned and I am able to apply more logic to my purchase plans.  
  • What am I willing purge to acquire you? Once your stash is at a manageable level, many organizational experts ask their clients to adopt the one in, one out principle.  When you acquire a new stamp set or paper pad, one should leave. 
My journey is continuing, but I can already see tremendous progress and it motivates me to keep going. I can visualize my completed space, and it's one that will be a joy to use.

I know there have been lots of words in this post and no pretty crafty projects (what?!), so thanks for hanging in there.  Before I go, I wanted to share with you a few sites that are offer fantastic inspiring reads on minimalism and letting go of excess. 
Katie

Wednesday, May 21, 2014

Stamp Out Chaos- Striving to Simplify

Hello friends,

I am afraid I don't have much to share today in terms of pretty pictures showing off all the progress I have made on my space.  It's the end of the school year and my time is being spent helping the kids with their end of the school year projects (including creating a traditional Swedish children's outfit from Goodwill finds + ribbon and trim picked up at Jo Ann Fabrics AND whipping up a crock pot of Swedish Meatballs to feed an army of hungry 4th graders for their International Buffet... seriously, Heritage Day, I am looking at you).

Lindsay and I embarked on our journey to Stamp Out Chaos a couple months ago, and I did want to take some time to share some of my thoughts and what I am learning through this process.  Recently, I have been drawn more and more to practicing minimalism in my home.  Now I am not talking 'bare walls and mattress on the floor' minimalism, but a rational minimalism that makes sense for a busy family of 4. Living with what is truly essential and necessary- nothing more, nothing less.

I have come to the realization that I am a really bad manager of stuff- my husband's stuff, my kids' stuff, and if I am being honest, my own stuff too.  I function best in an orderly environment, but over the years, between working full-time, the family, church and community commitments, I have been conditioned to survive in some degree of chaos.  It's not an ideal fit.

This most certainly applied to what what happening in my creative space.  I felt like I was spending more time organizing and maintaining my crafty stash than I actually spent creating and something had to give.  In my reading on minimalism, I came across the following quote from Joshua Becker of Becoming Minimalist, who said "owning less is far more beneficial than organizing more."


This spoke to me in a profound way.  In some ways, the evolution of my personal card-making style also supports the pursuit of simple, but it wasn't really until it was pointed out to me (a couple of times because I can be dense like that...) that it began to seep in. 

Last week, on Plugged in with Paper Crafts and Scrapbooking blog Kerri Miller highlighted a few of my cards and wrote about the importance of sticking to your style, mine being clean and unfussy.  In April, in writing my introduction for the Waffle Flower Crafts Design team, Nina wrote "I also love that she can create something very unique from very simple supplies." 


Now, I am not attempting to #humblebrag here.  It is just funny to me that other's can see clearly what can elude you for so long.  I have struggled for years to define my style and here it was, spelled out clearly that my most successful designs are those that are clean, simple, unfussy with a twist.  

Needless to say, there was a whole lot of fussiness happening in my craft room, and I needed to reassess and rationalize my space in order for it to support me creatively. Big changes seem to be in order and LOTS of them. 


And while change can be hard and require a lot of patience, I know that it will be worth it.  

What's changing first? 
Let's talk about this blog.  Don't worry, I am not abandoning it, but I will be changing it's look and title in the coming week.  When I selected "our charmed life" back in 2008, I started the blog as a place to share family stories and pictures.  I was much more of a scrapbooker back then and the name was actually inspired by a title card from My Mind's Eye.  It quickly evolved to be more of a platform for my paper crafting and I feel that it's name should somehow represent my approach.   

That's all for me today, but more to come on this topic including some about the process that I am using to take stock and reassess my space and supplies.  And now that I have rambled on and on, how about you?  Do you feel that your crafty environment reflects your style?   How so?  Do you think that's important or is the final product all that really matters? Do you practice some level of minimalism in your life?  I would love to hear your thoughts!  

Thanks for stopping by! 
Katie

Wednesday, May 7, 2014

Stamp Out Chaos: Embellishments


Hello there friends,

Lindsay and I are back today with another step in our journey to Stamp Out Chaos.  This week, we are tackling the "underembellie" of crafty organization- embellishments!  If you missed an earlier post or what to see where we started, check it out here.

From hardware organizers to tackle boxes, there are so many options for organizing the little things and do-dads of our hobby.  Over the years, with embellishments particularly, I have learned that I need to see them in order to remember to use them.  At the same time, they need to be contained and organized.  After MUCH trial and error, here are some options that have been working for me...


I have been keeping all of my wood veneer, metal, flair, resin, etc in plastic bead organizers that I picked up at Hobby Lobby.  Pretty much any embellishment that is on the small side and come in a package containing multiples winds up here. These organizers are inexpensive and great for travel.  They also stack quite nicely in one of the cubbies of my Expedit. 


Enamel dots get their own storage box.  I picked this one up in the unfinished wood craft area of Hobby Lobby.  I will get around to painting it soon, but for now, it does it's job.  You will notice that I remove the dots from their original packaging.  They are simply easier to access for me that way.  I can generally recall manufacturers and usually buy dots from the same 2-3 makers.  Another idea would be to affix a simple dot label to the back of the clear sheet with the initials of the manufacturer.      When not in use, this box sits on a shelf above my work area. 


This organizer from Land of Nod sits on the corner of my desk or the shelf above my desk.  Unfortunately, I think it may have been discontinued, it was a part of the "I could have bin a container" series.   It holds lots of supplies for Project Life and embellishments that are a bit random- they may be large or oddly shaped and therefore, won't fit into one of my other solutions, so they hang out here until I am ready to use them. 


Sequins!  So I tried storing sequins in one of the bead boxes that I use for my wood veneer and that was a bit of a mistake.  The bead box lid does not prevent the sequins from co-mingling which can easily happen when traveling or if the box is jostled in the slightest bit.  Lindsay actually found this brilliant solution in the beading section of JoAnn's and I happily borrowed a page from her book of tricks.  I love that all the containers have their own screw-on lids, so my colors stay tidy.  I am not sure that the acrylic box that holds all the sequin pots is sturdy enough for tough travel conditions, but I have been using this for a few months and it has served me well.  I see in the picture above that I only have two open spots remaining.... hmmm... I may need to pick up another one.


This shelf is hung above my craft desk and I decided to put the scrolled brackets to use by resting a metal dowel rod on the brackets and using curtain clips to hang us packets of die cuts, sticker letters and other embellishments.  Previously, these items sat in a basket and I would forget that they were there.  I am really happy with this arrangement because they are visible and let's face it, crafty products are just inspiring to look at!

So with all these freshly organized inspiring embellishments at my disposal, I decided to make a card featuring three different types of embellishments- stickers, wood veneer and sequins.


These cute little wooden umbrellas came in my March Studio Calico kit.  Umbrellas always make me think about Mary Poppins, so I stamped a London Skyline using Papertrey Ink's City Scene set.  


I didn't have a sentiment that would work for this card, so I made my own by combining some stickers from My Mind's Eye with a computer generated sentiment.  The font I used is called Sofia. 


A few sequins finish off the card.  Speaking of Sofia or Sophie in my case, I was trying a different angle to photograph the card and I got photobombed by Alvin from Alvin and the Chipmunks.  Say it with me now.... ALVIN!!!


Well, that's all for me today.  Please be sure to stop by Lindsay's blog to a peak into how she organizes her embellishments!  We'll be back in a few weeks with another area of the crafty room to tackle.  Can't wait!!  

Thanks for stopping by! 
Katie


Wednesday, April 23, 2014

Stamp Out Chaos update and a Publication share

Hello friends!

So I am afraid that the Easter holiday got the better of me over the past couple weeks and I don't have a Stamp Out Chaos update to share this week. Sad face... :(  I promise that the next Stamp Out Chaos post will be on May 7 and Lindsay and I will be taking on the topic of Embellishments.

Over the past couple of weeks I have made progress on my space including purging over 6 boxes of craft supplies and donating it to Sophie's Kindergarten teacher.  I have also pulled out some under-loved stamps and dies which I will be listing for sale in the coming week.

I am afraid I have come to the point though in my organizational journey that I have to get serious about making improvements to the room.  After all, there is only so much that can be done within the confines of an Expedit cube.  Yes, friends, I am talking about spackle and paint.  I can tell myself that spackle is like embossing paste for the walls, but that won't change the fact that I have a messy and time-consuming project ahead of me.  I have picked up a few paint swatches and have taped them up on the wall to try them out a bit.


So far, I am leaning toward the lightest shade on the middle swatch card called Polar Star (aka light gray).  I think I am looking for something neutral against which I can accent with bold accent colors.  

Once the painting is complete, I can hang a shelf above my work area that I think will be critical in helping me keep some essential supplies orderly and within reach.  I will also be able to tackle die storage which will help immensely. More to come on that in the coming weeks.


Well, I don't want to sign off today without something creative, so I wanted to share a card I made for the Get Well feature in the April 2014 issue of Paper Crafts and Scrapbooking Magazine.   It was featured on the Plugged In with Paper Crafts and Scrapbooking magazine a few weeks back. 


It's call "Get Well Cone of Shame." Those Paper Crafts editors are too clever. The dachshund is a Silhouette cut file and I fashioned a cone from vellum and wrapped it around the dog's head.  The shadow is from a watercolor stamp set and the sentiment is from Lawn Fawn.  

Well that's all for me today!  Thanks so much for stopping by!
Katie